
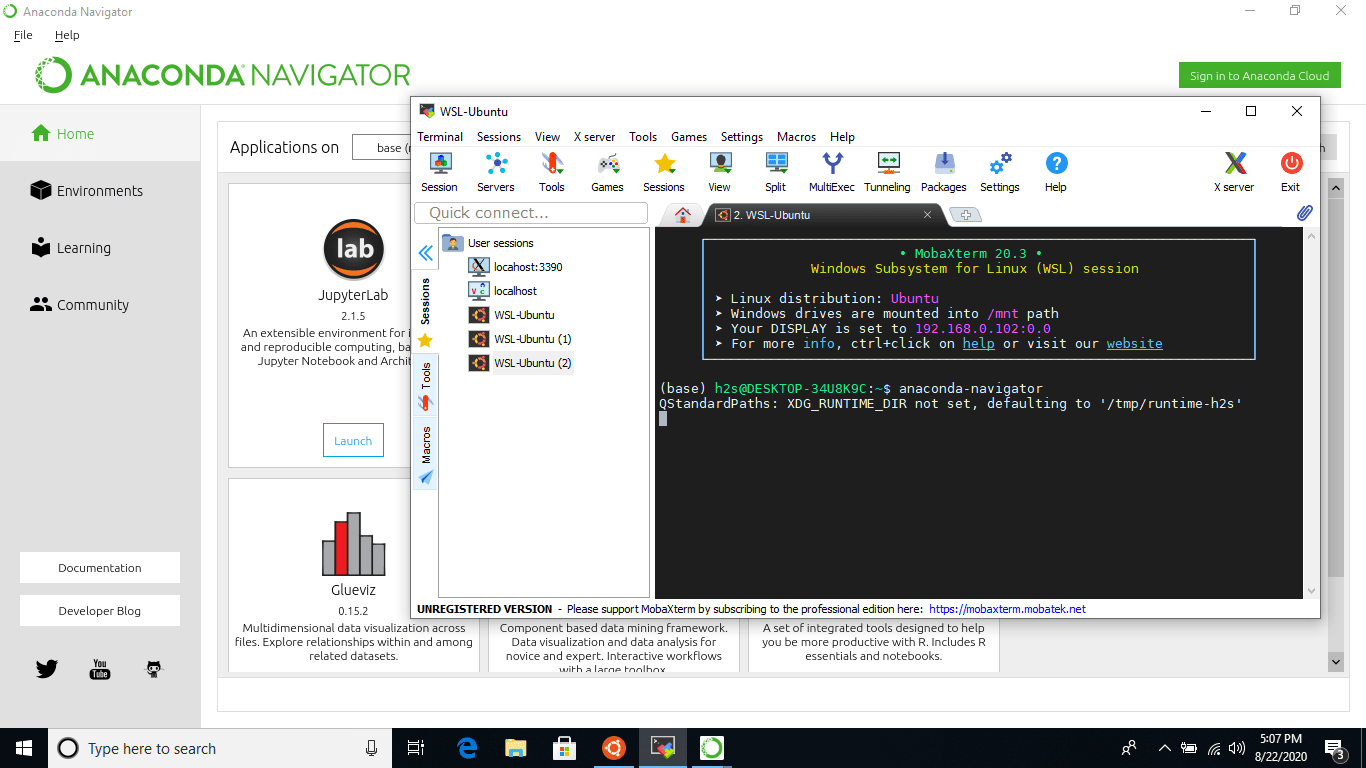
Установить рабочий стол Linux в Windows
Использование статических MAC-адресов с отказоустойчивой кластеризации
Виртуальные машины Linux, которые будут развернуты с помощью отказоустойчивой кластеризации, должны быть настроены со статическим mac-адресом управления доступом к мультимедиа для каждого виртуального сетевого адаптера. В некоторых версиях Linux конфигурация сети может быть потеряна после отработки отказа, так как новый MAC-адрес назначается виртуальному сетевому адаптеру. Чтобы избежать потери конфигурации сети, убедитесь, что каждый виртуальный сетевой адаптер имеет статический MAC-адрес. MAC-адрес можно настроить, изменив параметры виртуальной машины в диспетчере Hyper-V или диспетчере отказоустойчивости кластеров.
Выбор локального ресурса
К локальным ресурсам относятся принтеры, буфер обмена и локальные диски на компьютере, на котором выполняется VMConnect. Дополнительные сведения см. .
Чтобы выбрать локальный ресурс, выполните следующее.
-
Откройте VMConnect.
-
Выберите виртуальную машину, к которой нужно подключиться.
-
Нажмите кнопку Показать параметры.
-
Выберите Локальные ресурсы.
-
Нажмите кнопку Дополнительно.
-
Выберите диск, который нужно использовать на виртуальной машине, и нажмите кнопку ОК.
-
Выберите Сохранить мои параметры для подключения к этой виртуальной машине.
-
Нажмите кнопку Соединить.
Путь к локальному диску, совместно используемому виртуальной машине на виртуальной машине под управлением Windows, находится в разделе Этот компьютер в разделе Перенаправленные диски и папки. Путь к гостевой виртуальной машине под управлением Linux находится в папке /home/shared-drive.
Создание виртуальной машины Hyper-V
Какие функции имеет Hyper-V?
Hyper-V предлагает множество функций. Это обзор, сгруппированный по функциям, предоставляемым или помогающим в работе.
Вычислительная среда . Виртуальная машина Hyper-V включает те же основные компоненты, что и физический компьютер, например память, процессор, хранилище и сеть. Все эти части имеют функции и параметры, которые можно настроить разными способами для удовлетворения различных потребностей. служба хранилища и сети могут считаться своими категориями, из-за множества способов их настройки.
Аварийное восстановление и резервное копирование . для аварийного восстановления реплика Hyper-V создает копии виртуальных машин, предназначенные для хранения в другом физическом расположении, чтобы можно было восстановить виртуальную машину из копии. Для резервного копирования Hyper-V предлагает два типа. В одном из них используются сохраненные состояния, а в другом используется служба теневого копирования томов (VSS), что позволяет создавать резервные копии, совместимые с приложениями, для программ, поддерживающих VSS.
Оптимизация . Каждая поддерживаемая гостевая операционная система имеет настроенный набор служб и драйверов, называемый службами Integration Services, которые упрощают использование операционной системы на виртуальной машине Hyper-V.
Переносимость — такие функции, как динамическая миграция, миграция хранилища и импорт и экспорт, упрощают перемещение и распространение виртуальной машины.
удаленное подключение . Hyper-V включает подключение к виртуальной машине, средство удаленного подключения для использования с Windows и Linux. В отличие от удаленный рабочий стол, это средство предоставляет доступ к консоли, что позволяет увидеть, что происходит на гостевом компьютере, даже если операционная система еще не загружена.
Безопасность — безопасная загрузка и экранированные виртуальные машины помогают защититься от вредоносных программ и другого несанкционированного доступа к виртуальной машине и ее данным.
сводные сведения о функциях, появившихся в этой версии, см. в статье новые возможности Hyper-V на Windows Server. Некоторые функции или части имеют ограничение на количество, которое можно настроить. Дополнительные сведения см. в разделе Планирование масштабируемости Hyper-V в Windows Server 2016.
Установка Windows Admin Center для управления Hyper-V 2019
Как китайцы Windows XP клонировали
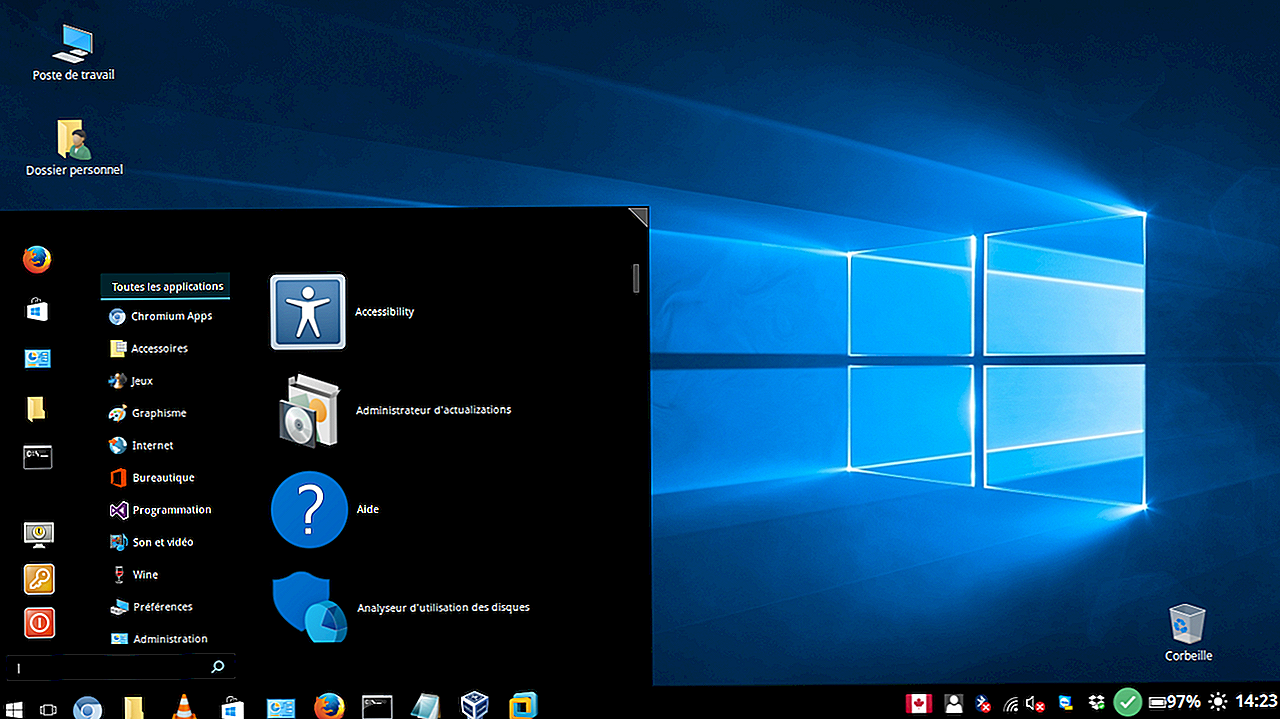
В мире существует еще как минимум один пример интеграции графической оболочки Microsoft в состав дистрибутива Windows – национальная операционная система Китая NeoKylin. Но, если в Linuxfx используется интерфейс современной Windows 10, то NeoKylin, показанной в 2015 г., имеет дизайн, схожий с Windows XP образца 2001 г.
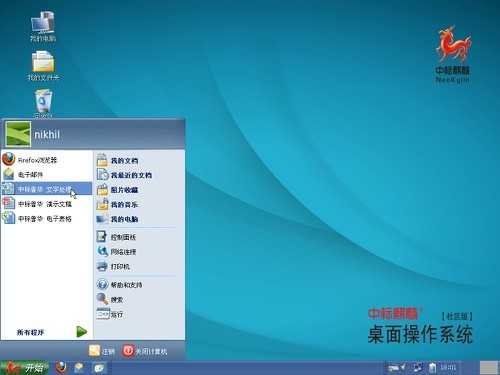 Интерфейс китайского дистрибутива NeoKylin
Как сообщал CNews, NeoKylin разработана компанией China Standard Software, и за ее основу взят дистрибутив Fedora.
NeoKylin тоже поставляется с небольшим количеством приложений: веб-браузером Firefox, музыкальным плеером, редактором изображений GIMP, калькулятором и т. д. В системе даже есть игра, напоминающая «Сапера» в Windows. Однако, в отличие от Linuxfx, установка сторонних приложений в NeoKylin не поддерживается.
Запуск виртуальной машины и установка Windows на нее
Здесь тоже все просто, но немного непривычно для тех, кто ранее не сталкивался с Hyper-V.
В диспетчере Hyper-V:
- для запуска виртуальной машины нажмите «Пуск»
- для взаимодействия с ней нажмите «Подключить» или дважды щелкните эскиз машины
Когда в параметрах машины указан загрузочный ISO-образ Windows, вы увидите на экране знакомую надпись Press any key to boot… Дальше вы уже сами справитесь, но если вам нужны пошаговые инструкции по установке, они есть на OSZone для Windows 7 и Windows 8.
Если операционная система на физической машине новее той, что установлена на виртуальной, рекомендуется обновить компоненты интеграции (спасибо, Артем). Для этого подключитесь в диспетчере Hyper-V к виртуальной машине, нажмите Ctrl + I и запустите setup.exe.
Creating and Configuring a VM
Let’s look at how to create and configure an Ubuntu 20.04 VM from scratch in Hyper-V. In this blog post, I’m using Windows 10 Pro version 20H2 with Hyper-V installed. The hostname of my Windows 10 host machine is home-pc. You have to enable Hyper-V before you can run the Ubuntu VM. If you don’t have Hyper-V installed on your Windows host, read how to install Hyper-V on Windows 10 and Windows Server 2019.
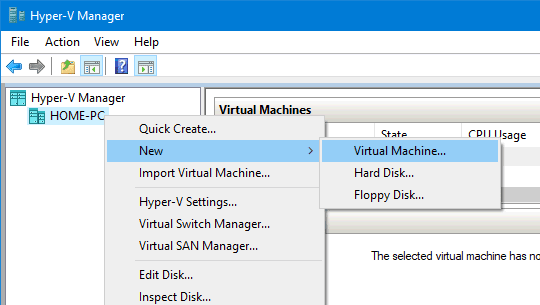
In order to create a new VM in Hyper-V, open Hyper-V Manager, right-click your host machine name and, in the context menu, click New > Virtual Machine.
The New Virtual Machine Wizard opens. You can skip the Before You Begin step.
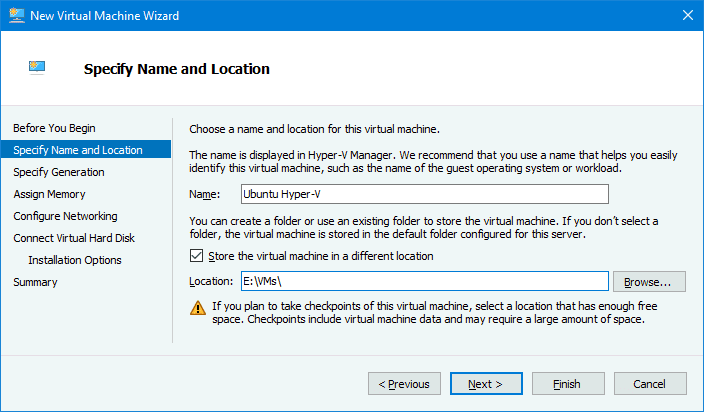
Specify Name and Location. Enter a virtual machine name, for example, Ubuntu Hyper-V. Select the Store the virtual machine in a different location checkbox, and select the folder where you want to store VM files, for example, E:\VMs\. Hit Next at each step of the wizard to continue.
Specify Generation. Select the generation of the new VM. It is better to select Generation 2 because more features are available and limits are higher. Generation 2 VMs use UEFI. Read more about Hyper-V Generation 1 and Generation 2 VMs.

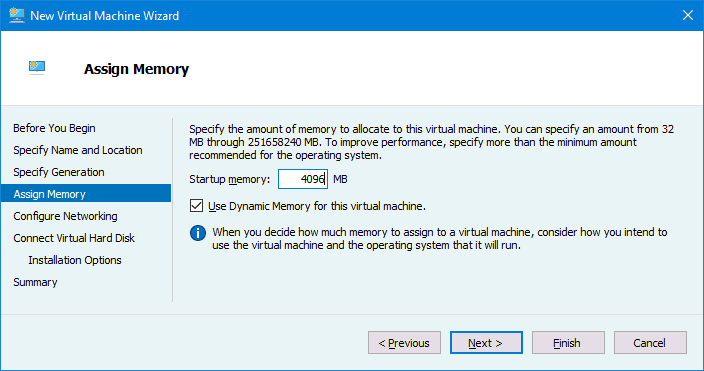
Assign Memory. Specify the amount of memory available to the VM. I select 4096 MB, which is enough to run Ubuntu without performing heavy tasks. Select the checkbox to Use Dynamic Memory for this virtual machine. The more memory you assign to the VM, the more convenient the work. Don’t assign all the memory of your computer to the VM; leave memory for the host operating system. If you run other VMs simultaneously with this Linux VM, remember that other VMs also need memory.
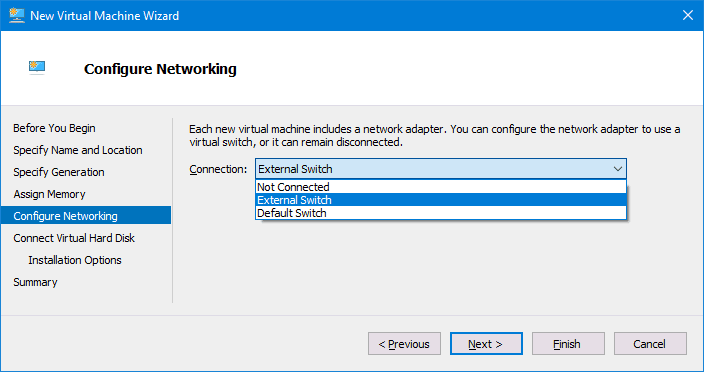
Configure Networking. Select a virtual switch to which the virtual network adapter of the VM will be connected. If you have not created any virtual switches, you can do it later and edit the VM configuration.
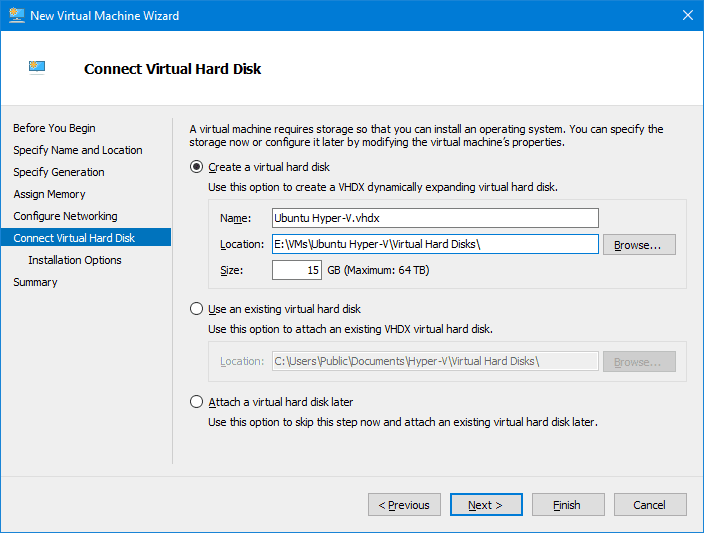
Connect Virtual Hard Disk. Click Create a virtual hard disk. Enter the virtual disk name, for example, Ubuntu Hyper-V.vhdx. Define the location of the virtual disk file. You should select the location in your directory used to store Hyper-V VMs. In my case, the selected directory is E:\VMs\Ubuntu Hyper-V\Virtual Hard Disks\. Set the virtual disk size. I select 15 GB for my Ubuntu 20.04 VM used for testing purposes.
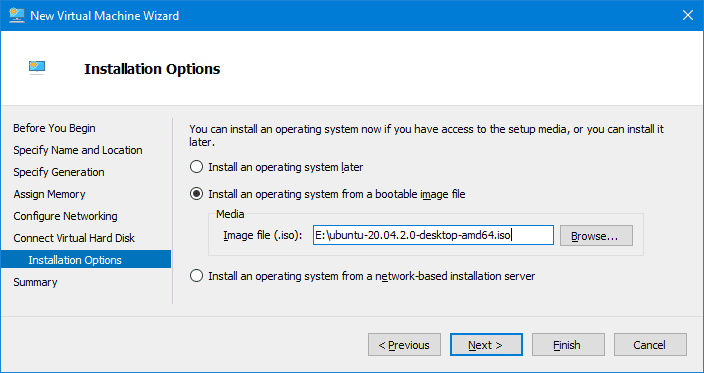
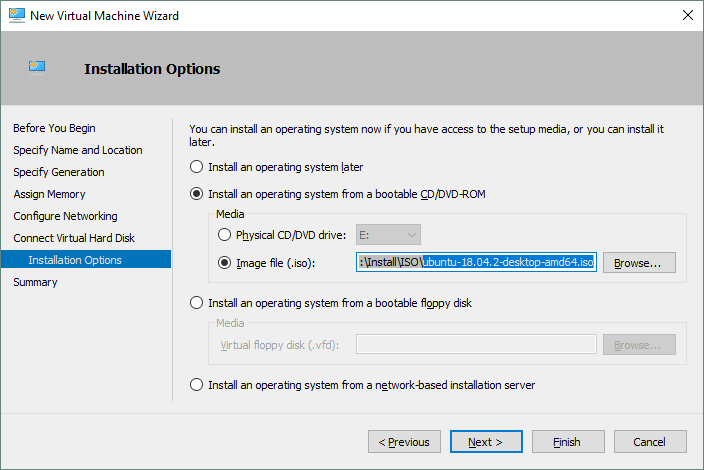
Installation Options. Select Install an operating system from a bootable image file. Click Browse and select the location of the Ubuntu 20.04 ISO installation image. The Ubuntu version I’m going to install is 20.04.2. You can download the installation image from the official Ubuntu website.
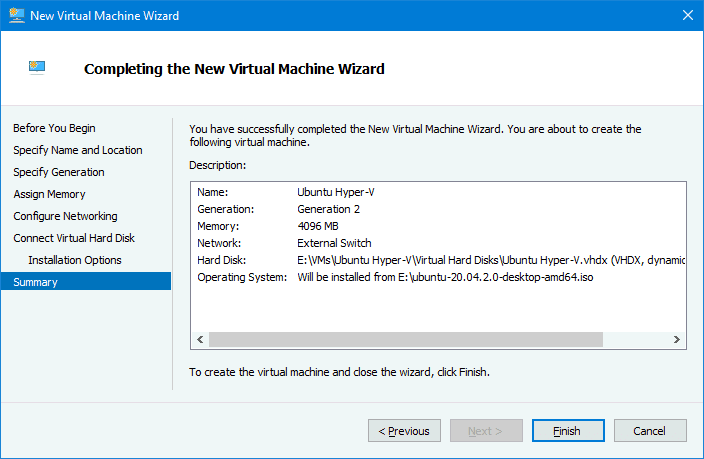
Summary. Check configuration summary, and click Finish to finish the new VM creation.
Open the settings of the Ubuntu Hyper-V virtual machine that you have already created. Right-click the Ubuntu Hyper-V VM in Hyper-V Manager and, in the context menu, hit Settings.
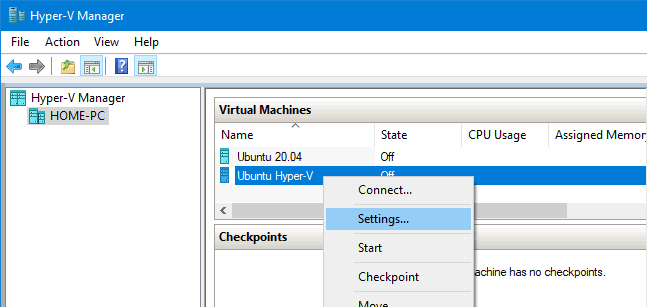
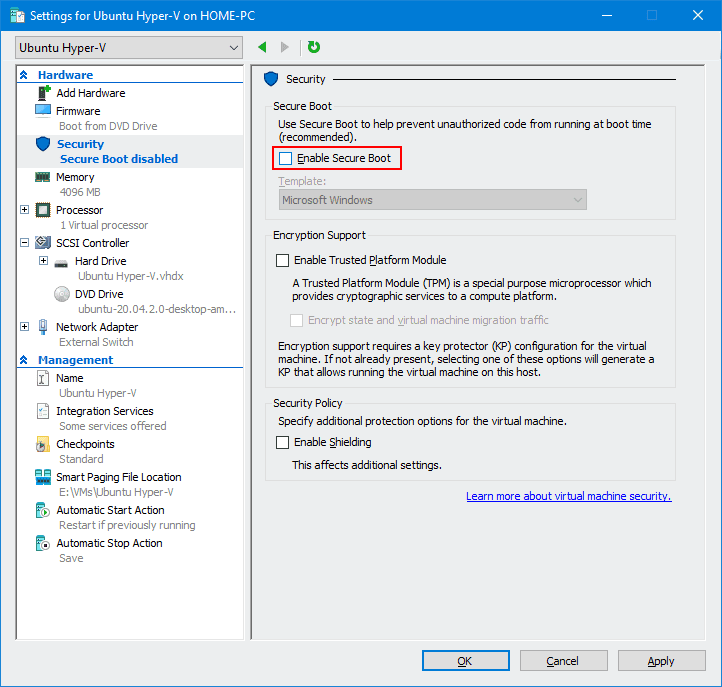
In the navigation pane, select Security in the Hardware section, and deselect the Enable Secure Boot checkbox. Secure boot is not needed for this virtual machine. You can check and edit other VM settings if needed. Click OK to save settings and close this window.
Установка Hyper-V
Системные требования Hyper-V
Настройка доступа в Интернет и локальной сети
Инструкции из этого раздела необходимы лишь в том случае, если вас не устраивает появившийся в Windows 10 1709 коммутатор по умолчанию (Default Switch), который нельзя удалить или переименовать. При использовании Default Switch в случае подключения хоста к VPN виртуальная машина также использует VPN. В этом заключается одно из главных отличий от внешнего коммутатора, создание которого я опишу дальше.
В меню Действия выберите Настройка виртуальных коммутаторов. Откроется окно, в котором можно создать коммутатор одного из трех типов. Чтобы ваша виртуальная машина могла выходить в Интернет, создайте внешний коммутатор.
Теперь нужно задать имя коммутатора и выбрать сетевой адаптер, если у вас их больше одного. Дома я использую беспроводную сеть, поэтому выбрал адаптер Wi-Fi.
Остается лишь указать созданный коммутатор в параметрах сетевого подключения виртуальной машины.
Теперь в установленной Windows у вас будет подключение к Интернету и локальная сеть между физической и виртуальной машинами.
На рисунке выше вы видите:
- слева – результат добавления виртуального коммутатора в Hyper-V на физической машине, т.е. сетевой мост и виртуальный адаптер
- справа – доступ в Интернет и подключение к локальной сети на виртуальной машине
Как видите, настройка Интернета и локальной сети не столько сложна, сколько непривычна для пользователей клиентских ОС Microsoft.
Плюсы и минусы Hyper-V
Conclusion
If you have never used Linux, installing Ubuntu on Hyper-V can be the first step to opening the gate to the world of Linux. Creating a new virtual machine is straightforward, but some manual configurations should be made after installation is finished.
Running Linux VMs on Hyper-V hosts allows you to clone and migrate VMs easily. Two machines must not have the same host name and IP address, and for this reason, basic network configuration was explained. Hyper-V Linux Integration Services can improve the performance of VMs.
While the operating system is running on a VM, both Windows and Windows virtual machines should be backed up to protect precious data. NAKIVO Backup & Replication can back up your Hyper-V VMs in the best way possible.
Поддерживаемые версии настройки виртуальных машин
Использование Hyper-V Quick Create для развертывания виртуальной машины
После установки Hyper-V у вас также есть возможность использовать Hyper-V Quick Create.
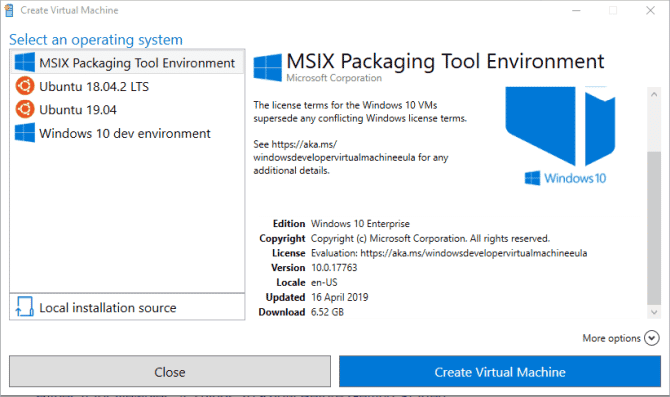
Hyper-V Quick Create быстро создает виртуальную машину.
Тип гипер v В строке поиска начального меню выберите Hyper-V Quick Create. Выберите локальный источник установки, перейдите к установочному диску гостевой операционной системы (или .ISO) и выберите «Создать виртуальную машину». Процесс занимает всего несколько секунд, после чего вы можете изменить настройки виртуальной машины.


Хотя второй метод намного быстрее, полезно знать, как получить доступ к диспетчеру Hyper-V и использовать его.
Требования к системе
Hyper-V доступен в 64-разрядных версиях Windows 10 Профессиональная, Корпоративная и для образовательных учреждений. Он недоступен в версии Домашняя.
Большинство компьютеров работают под управлением Hyper-V, однако каждая виртуальная машина работает под управлением полностью отдельной операционной системы. Как правило, на компьютере с 4 ГБ ОЗУ можно запустить одну или несколько виртуальных машин, однако для запуска дополнительных виртуальных машин либо установки и запуска ресурсоемкого ПО, такого как игры, видеоредакторы или программы для технического проектирования, потребуются дополнительные ресурсы.
Дополнительные сведения о требованиях Hyper-V к системе и о том, как проверить, будет ли Hyper-V работать на конкретном компьютере, см. в статье Справочник по требования к системе для Hyper-V.
Creating a New Hyper-V VM
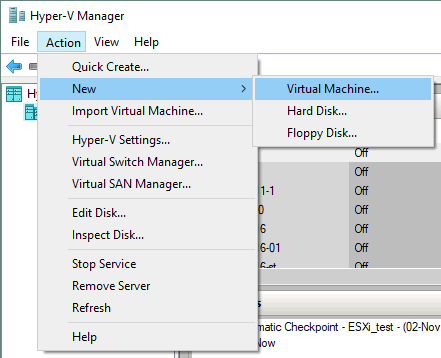
First, make sure that the Hyper-V role (feature) is enabled on your Windows machine (go to Control Panel > Programs and Features > Turn Windows features on or off and verify whether the check box near the Hyper-V string is ticked). In order to create a new virtual machine, open Hyper-V Manager and click Action > New > Virtual Machine. The New Virtual Machine Wizard should appear.
Before You Begin. There is nothing to configure at this step.
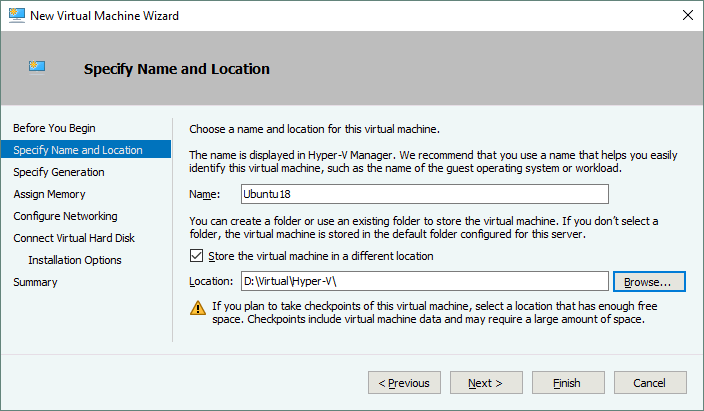
Specify Name and Location. Enter your VM name, for example, Ubuntu18 and select a folder where you will store a new VM. Try to use volumes that are different from your system volume C:. In this case a directory on disk D: is used (D:\Virtual\Hyper-V). You can enter the path manually or select a location by clicking the Browse button.
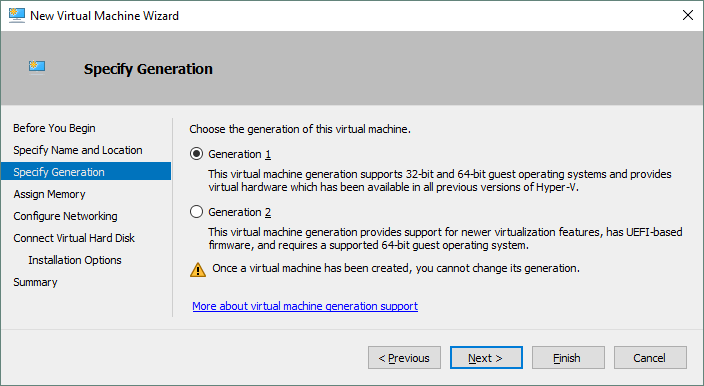
Specify Generation. Choose the generation of this virtual machine – Generation 1 or Generation 2. Generation 1 is selected in this example due to better compatibility.
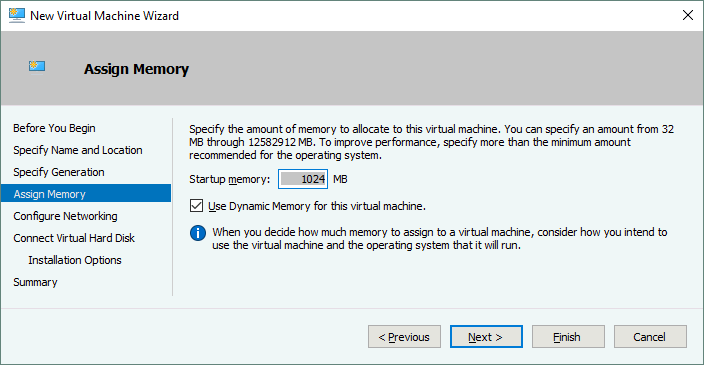
Assign Memory. Specify at least 1 GB of memory for your Ubuntu Linux machine with GUI. You can edit memory settings after VM creation. Tick the Use Dynamic Memory for this virtual machine checkbox to use your hardware memory resources more rationally.
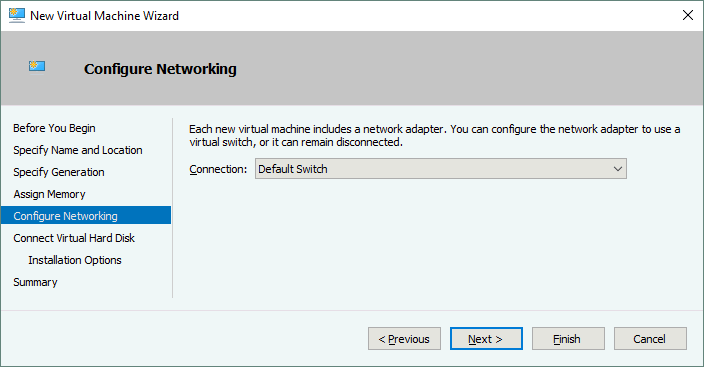
Configure Networking. Select a virtual switch to which the virtual network adapter of your VM will be connected. The Default Switch is used in this case. Later you can create and configure other virtual switches and connect your VM to the appropriate networks.
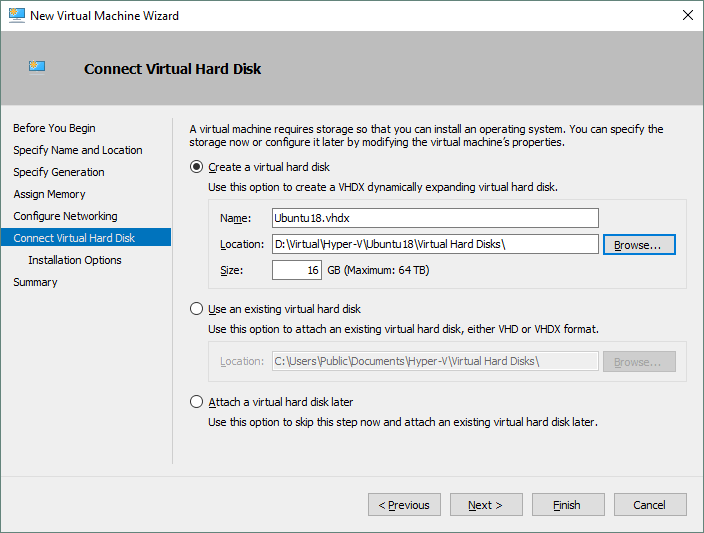
Connect Virtual Hard Disk. Select the Create a virtual hard disk option. A dynamic VHDX virtual disk is created by default. Enter the virtual disk name (for example, Ubuntu18.vhdx), select the location and set the size of the virtual disk (at least 16 GB).
Installation options. Select the Install an operating system from a bootable CD/DVD-ROM. Select Image file (.iso) and browse the ISO installation image of Ubuntu18 that has been downloaded before.
Summary. Check your settings in the installation summary and click Finish to create a new virtual machine.
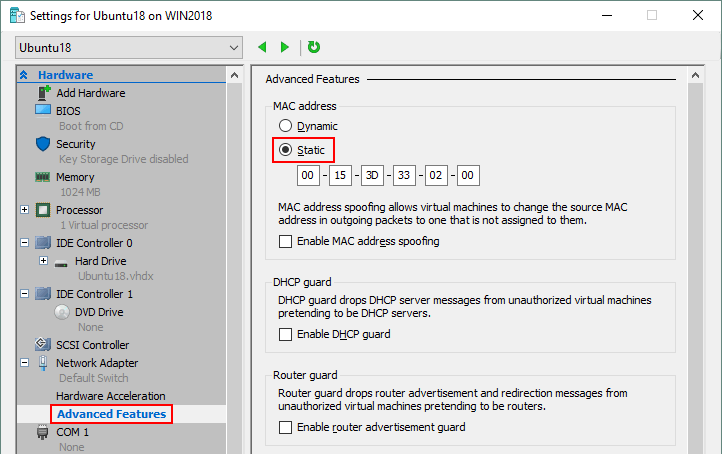
Set the Static MAC Address
Now your new empty VM has been created and you can edit the different VM settings, such as MAC address. It is better to use a static MAC address for Linux running on Hyper-V especially if your Linux VM needs to be migrated between Hyper-V hosts. Right click your VM name and click Settings. In the Settings window, select your network adapter, and expand the network adapter options by clicking the + icon. Click Advanced Features and in the right section of the window select a static MAC address. Click OK to save changes.
Configuration on the Host Windows Machine Running Hyper-V
You have to allow the enhanced session mode in general Hyper-V settings. Otherwise, the enhanced session mode icon will be inactive in the VM window. Open Hyper-V Manager, right-click the name of your host Windows machine on which Hyper-V is installed, and, in the context menu, click Hyper-V Settings.
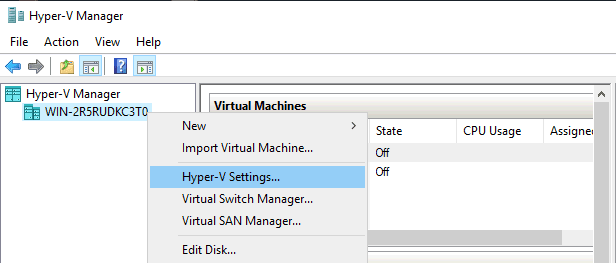
Select the Enhanced Session Mode Policy in the navigation pane, and then select the Allow enhanced session mode checkbox. Hit OK to save Hyper-V settings and close the window.

Now you should set Hyper-V to enable the enhanced session mode using the HvSocket for the “Ubuntu Hyper-V” VM on which Ubuntu 20.04 is installed.
Run this command in PowerShell (as administrator) on the host Windows machine running Hyper-V:
Set-VM -VMName <your_vm_name> -EnhancedSessionTransportType HvSocket
Use double quotas if the VM name contains spaces. In my case the command is:
Set-VM -VMName “Ubuntu Hyper-V” -EnhancedSessionTransportType HvSocket

You may see the following error:
Set-VM : A parameter cannot be found that matches parameter name ‘EnhancedSessionTransportType’.
At line:1 char:30
+ Set-VM -VMName “Ubuntu20-04” -EnhancedSessionTransportType HvSocket
+ ~~~~~~~~~~~~~~~~~~~~~~~~~~~~~
+ CategoryInfo : InvalidArgument: (:) , ParameterBindingException
+ FullyQualifiedErrorId : NamedParameterNotFound,Microsoft.HyperV.PowerShell.Commands.SetVM
This error can occur if you use the old version of PowerShell, which doesn’t support new cmdlets and parameters.

In this case, follow this recommendation: Try to update your host Windows operating system to Windows Server 2019, Windows 10 1803, or newer. If you cannot update the operating system, update Windows PowerShell to a newer version that includes the needed cmdlets and features.
You may need to reboot the Hyper-V host (don’t forget to run the last command to enable the enhanced session mode for Ubuntu 20.04 for Hyper-V in PowerShell). Stop and start the Linux VM. When Ubuntu is booted, you should see a window with VM display configuration and other options of the enhanced session mode. Click Show options, and select the needed resources in the Local resources tab to connect the host resources to the guest OS (Ubuntu 20.04 in our case) of the VM. It is recommended that you uncheck printers for the first time to reduce the probability of issues.

Enter the username and password of your Ubuntu user in the Xorg login window. Notice that the enhanced session mode button is now active in the virtual machine window.

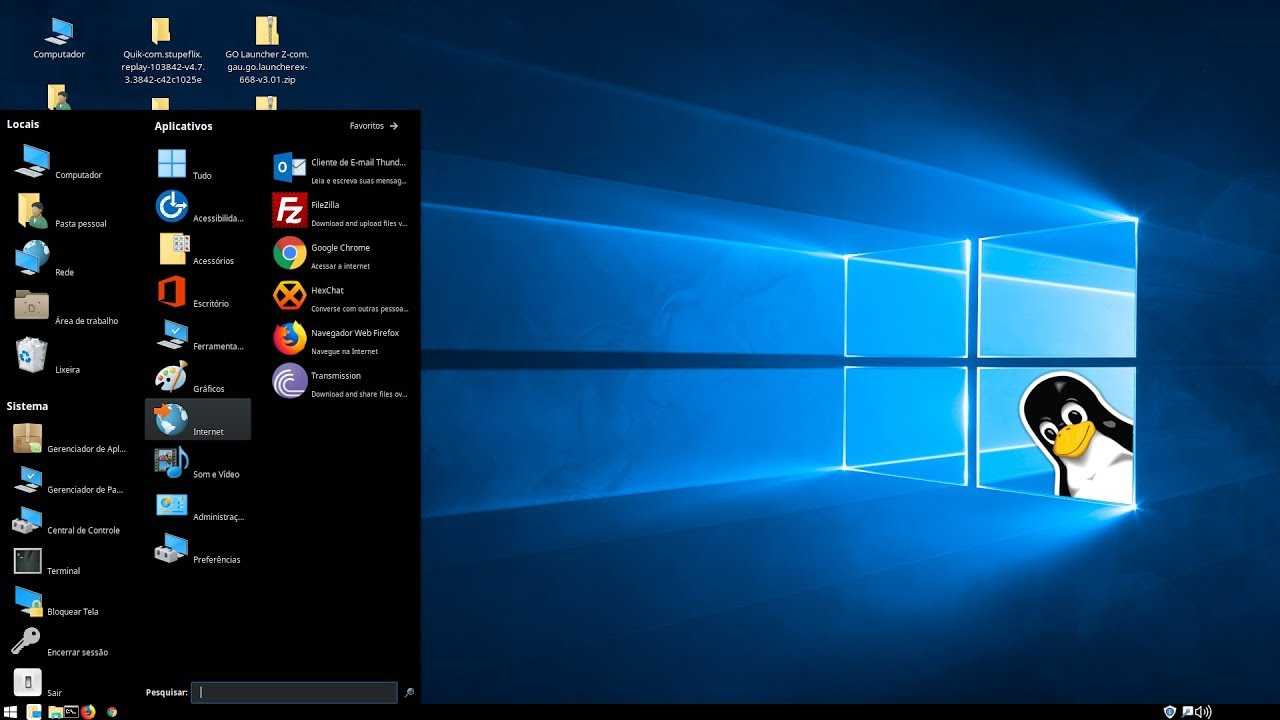
Now you should see the GUI (graphical user interface) and Desktop of Ubuntu 20.04. Try to use the shared clipboard and other sharing features, and changing screen resolution in the VM.

If you see a black screen after entering your credentials, the reason can be the following: A user has been already logged in to the desktop session of Ubuntu. Log out the user and end that session. Then try to connect to Ubuntu by using the enhanced session mode and Xrdp in Hyper-V. You can reboot the Ubuntu VM and connect to Ubuntu with the enhanced session mode.
If the enhanced session option is not available for your Ubuntu 20.04 guest in Hyper-V, try to edit the xrdp.ini configuration file located in /etc/xrdp. You should edit the file with root privileges. Edit two lines in the xrdp.ini file.
Change these parameters:
port=3389 to port=vsock://-1:3389
use_vsock=true to use_vsock=false
This issue should be fixed for Ubuntu 20.04.1.
Read also the blog post about configuring RDP on Linux to learn more about manual configuration.
Step 3: Create a virtual machine in Hypervisor
Now, we have the hyper-v and it’s time to create a Virtual Machine on Windows 10 using it. You can create any VM, however, here we will show how to install a Linux operating system Ubuntu. the process will be the same for Windows 8, 7, or CetnOS, Linux Mint, or any other OS.
Select Hyper-V Manager server
Right-click on the machine or hypervisor server available under the Hyper-V Manager and select the option “New -> Virtual Machine“.
Specify Name and Location
Give some name to your virtual machine. By default, it all will store under “C:\ProgramData\Microsoft\Windows\Hyper-V\” If you want to change it then check the box given in front of “Store the virtual machine in a different location” and then simply use the Browse button to select that location.
After that click on the Next button for further options.
Choose the generation of the Virtual Machine
You will get two options Generation 1 and Generation 2. The first one supports both 32-bit and 64-bit systems and also compatible with all previous versions of the Hyper-V. If you choose this then you will be able to use your Virtual machine VHD on other Windows platforms without installing it again. However, the same can be done for Generation 2 but only on the latest supported hardware and for the latest 64-bit guest operating systems.
Thus, leave this option as default and click on the Next button.
Assign RAM to Virtual Machine on Windows 10
As per the operating system, you are installing on Hyper-v you have to set the amount of memory for smoother operations. For example, here I am installing Ubuntu 19.04 with GUI and for good performance, it requires 4GB and the same I have allotted.
Configure Networking on Hyper-V
To provide internet connection and local connectivity, we need to assign an adapter to our virtual machine. The hyper-v provides its own default network adapter that can communicate with the host OS network. Thus, select the Default Switch and click on the Next button.

Create or Connect the Virtual hard disk
If you already have some VHD or VHDX virtual hard disk image then you can select that, however, here we are creating a new virtual machine, thus, enter the amount of VHD you want, here we are giving 20GB but you can select low or high depending on your system requirements.
After that click the NEXT button.
Select ISO file for installing the Linux operating system
This is a very important step because here we select our operating system ISO file which we want to install. Select the option “Image file (.iso)” and then click on the Browse button to navigate and choose the image file.
Then click on the NEXT and finish the Virtual Machine creation wizard.
Как пользоваться Linux в WSL
Ошибка «unable to connect to socket: Подключение не установлено, т.к. конечный компьютер отверг запрос на подключение. (10061)»
При использовании команды kex в Kali Linux (Win-KeX) может возникнуть ошибка:
unable to connect to socket: Подключение не установлено, т.к. конечный компьютер отверг запрос на подключение. (10061)

В командной строке выводится:
TigerVNC Viewer 32-bit v1.10.80
Built on: 2020-06-15 22:33
Copyright (C) 1999-2020 TigerVNC Team and many others (see README.rst)
See https://www.tigervnc.org for information on TigerVNC.

Fri Sep 11 06:41:39 2020
 DecodeManager: Detected 12 CPU core(s)
 DecodeManager: Creating 4 decoder thread(s)

Fri Sep 11 06:41:41 2020
 CConn:       unable to connect to socket: Подключение не
              установлено, т.к. конечный
              компьютер отверг запрос на
              подключение. (10061)
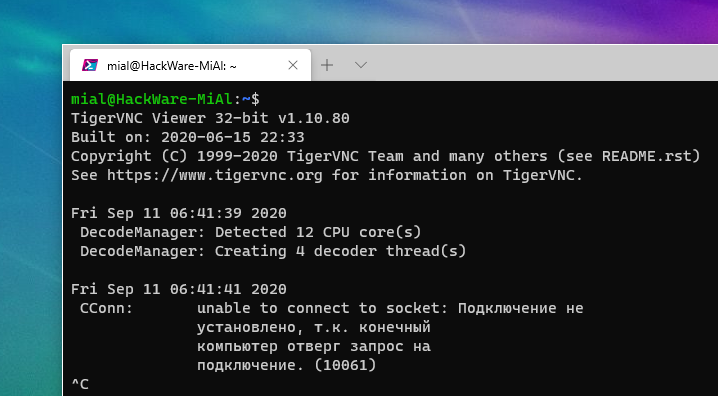
Для исправления этой ошибки нажмите Ctrl+c.
Затем введите команду
kex stop
Эта команда может вывести что-то вроде следующего:
Killing Win-KeX process ID 1618... which was already dead
Cleaning stale pidfile '/home/mial/.vnc/HackWare-MiAl.localdomain:1.pid'!
Cleaning stale x11 lock '/tmp/.X1-lock'!
Cleaning stale x11 lock '/tmp/.X11-unix/X1'!

Вновь попробуйте открыть графический интерфейс:
kex
На этот раз всё должно заработать:

Причина ошибки до конца не ясна — возможно, дело в неудачном старте VNC сервера или процесса Win-KeX, на это указывает строка «Win-KeX process ID 1618… which was already dead», то есть процесс уже мёртвый.
Командой kex stop мы принудительно останавливаем Win-KeX, который при следующем запуске работает нормально.
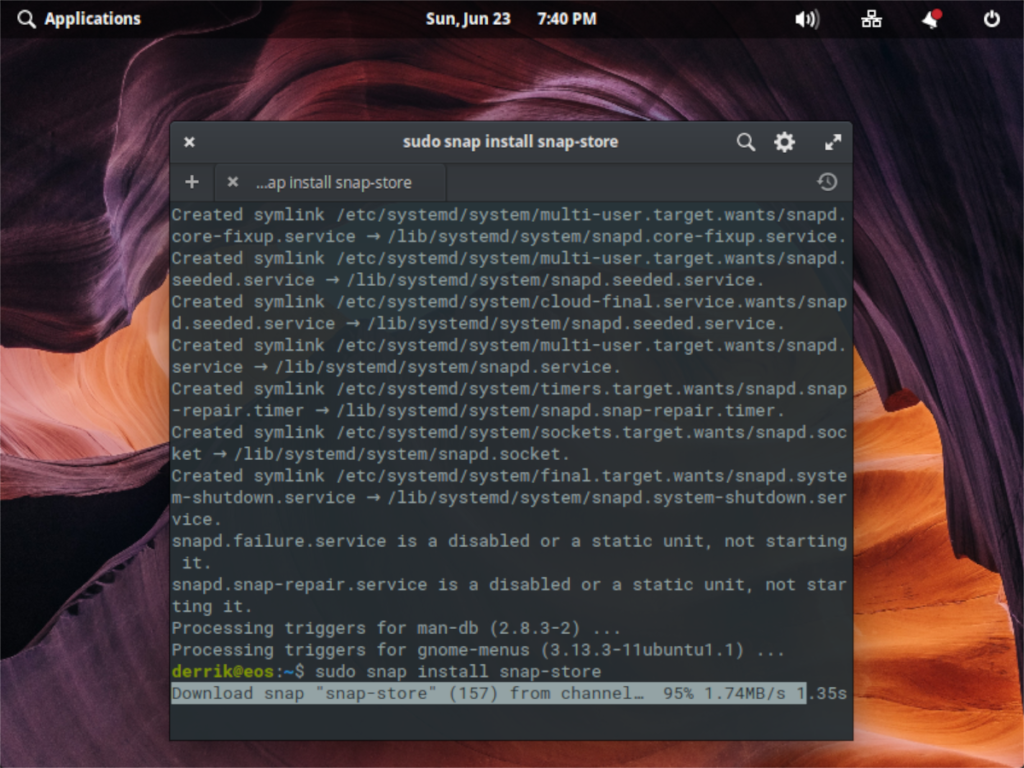
3. Kali Linux
В то время как Ubuntu и Debian являются дистрибутивами общего назначения, Kali Linux разработан для этичного взлома . Проект утверждает, что включает более 600 инструментов для тестирования на проникновение. Как и Ubuntu, Kali основана на Debian.
В состав дистрибутива входят утилиты для получения информации об удаленных компьютерах и попыток обнаружения в них уязвимостей.
Если вы попробуете это на компьютерах, к которым у вас нет официального доступа, у вас могут возникнуть большие проблемы. Мы не юристы, но вам, вероятно, следует попробовать эти инструменты только на своих собственных машинах, например на виртуальных машинах или в домашней лаборатории.
Дистрибутив также официально поддерживает рабочий стол Linux в Windows с Win-KeX. Рабочий стол может работать в отдельном окне или в «бесшовном» режиме, который разделяет рабочий стол Windows и Kali.
В остальном Kali Linux был бы хорошим дистрибутивом для начинающих экспертов по безопасности / информационной безопасности.
Скачать: Kali Linux для Windows
Опрос
Я познакомился с виртуальными машинами в 2004 году, когда начал заниматься автоустановкой Windows. С тех пор они стали неотъемлемой частью моей повседневной работы, включая тестирование системных настроек, программ и т.п.
Я хочу поблагодарить Дениса Дягилева за помощь в подготовке этого материала. Одним из преимуществ программы MVP является знакомство с лучшими специалистами по технологиям Microsoft. Это означает, что в частном порядке можно получить грамотную консультацию по любому вопросу ![]()
Денис также любезно предложил свою помощь в проведении дискуссии. Поэтому если у вас возникнут технические вопросы по этой статье, вы можете рассчитывать на квалифицированные ответы.
Результаты голосования утеряны в связи с прекращением работы веб-сервиса опросов.