
Restoring to a different location
If the profile folder names do not match or if you want to move or restore a profile to a different location, do the following:
- Completely close Thunderbird, as explained above.
-
Use the Thunderbird Profile Manager to create a new profile in your desired location, then exit the Profile Manager.
Note: If you just installed Thunderbird on a new computer, you can use the default profile that is automatically created when you first run Thunderbird, instead of creating a new profile. - Locate the backed up profile folder on your hard drive or backup medium (e.g., your USB-stick).
- Open the profile folder backup (e.g., the xxxxxxxx.default backup).
- Copy the entire contents of the profile folder backup, such as the mimeTypes.rdf file, prefs.js file, etc.
- Locate and open the new profile folder as explained above and then close Thunderbird (if open).
- Paste the contents of the backed up profile folder into the new profile folder, overwriting existing files of the same name.
- Start Thunderbird.
Moving a profile
Occasionally, you might want to move a profile or tell Thunderbird to use a profile stored in another location.
- Shut down Thunderbird.
- Move the profile folder to the desired location. For example, on Windows XP, move the profile from C:\Documents and Settings\\Application Data\Thunderbird\Profiles\xxxxxxxx.default to D:\Stuff\MyMailProfile. (If you are reverting to a backed up profile, this step isn’t necessary. Just note the current location of the profile you want to restore.)
- Open up the profiles.ini file in a text editor. The file is located in the application data folder for Thunderbird:
- In the profiles.ini file, locate the entry for the profile you’ve just moved. Change the Path= line to the new location.
- If you switch from a relative path to a non-relative path, the direction of the slashes may need to change. For example, in Windows, non-relative paths use backslashes, whereas relative ones use forward slashes. Change IsRelative=1 to IsRelative=0.
- Save profiles.ini and restart Thunderbird.
Removing a profile
After starting the Profile Manager as explained above, you can remove an existing profile as follows:
- In the Profile Manager, select the profile to remove, and click Delete Profile….
- Confirm that you wish to delete the profile:
- Don’t Delete Files removes the profile from the Profile Manager yet retains the profile data files on your computer in the storage folder, so that your information is not lost. «Don’t Delete Files» is the preferred option because it saves the old profile’s folder and allows you to recover the files to a new profile.
- Delete Files removes the profile and its files (including the profile bookmarks, settings, passwords, etc.). If you use the «Delete Files» option, the profile folder and files will be deleted. This action cannot be undone.
- Cancel interrupts the profile deletion.
Restoring to a different location
If the profile folder names do not match or if you want to move or restore a profile to a different location, do the following:
- Completely close Thunderbird, as explained above.
-
Use the Thunderbird Profile Manager to create a new profile in your desired location, then exit the Profile Manager.
Note: If you just installed Thunderbird on a new computer, you can use the default profile that is automatically created when you first run Thunderbird, instead of creating a new profile. - Locate the backed up profile folder on your hard drive or backup medium (e.g., your USB-stick).
- Open the profile folder backup (e.g., the xxxxxxxx.default backup).
- Copy the entire contents of the profile folder backup, such as the mimeTypes.rdf file, prefs.js file, etc.
- Locate and open the new profile folder as explained above and then close Thunderbird (if open).
- Paste the contents of the backed up profile folder into the new profile folder, overwriting existing files of the same name.
- Start Thunderbird.
Moving a profile
Occasionally, you might want to move a profile or tell Thunderbird to use a profile stored in another location.
- Shut down Thunderbird.
- Move the profile folder to the desired location. For example, on Windows XP, move the profile from C:\Documents and Settings\\Application Data\Thunderbird\Profiles\xxxxxxxx.default to D:\Stuff\MyMailProfile. (If you are reverting to a backed up profile, this step isn’t necessary. Just note the current location of the profile you want to restore.)
- Open up the profiles.ini file in a text editor. The file is located in the application data folder for Thunderbird:
- In the profiles.ini file, locate the entry for the profile you’ve just moved. Change the Path= line to the new location.
- If you switch from a relative path to a non-relative path, the direction of the slashes may need to change. For example, in Windows, non-relative paths use backslashes, whereas relative ones use forward slashes. Change IsRelative=1 to IsRelative=0.
- Save profiles.ini and restart Thunderbird.
Use the selected profile without asking at startup
When you have multiple profiles, this option tells Thunderbird what to do at every startup:
- If you check this option, the selected profile becomes the default, so Thunderbird will automatically load it every time it starts, until you choose a different default profile. To access other profiles, you must start the Profile Manager first.
- If you uncheck this option, Thunderbird will show you the Profile Manager each time it starts, so that you can select a profile to use.
Moving a profile
To copy all of your Thunderbird data and settings to another Thunderbird installation (e.g. when you get a new computer), you can make a backup of your Thunderbird profile, then restore it in your new location. For instructions on how to back up and restore a profile, see . If you need to move your Thunderbird data (accounts, messages, passwords and other data) to a new computer, see Moving Thunderbird Data to a New Computer.
Recovering information from an old profile
If you have important information from an old Thunderbird profile, such as bookmarks, passwords, or user preferences, you can transfer that information to a new Thunderbird profile by copying the associated files. For instructions, see Recovering important data from an old profile. You can also switch to a previous profile to recover old profile data. See Recover user data missing after Firefox update for details.
Файлы профиля Thunderbird
В профиле, Mozilla Thunderbird сохраняет все настройки пользователя клиента, а также пароли, адресные книги, расширения и, собственного говоря, сами файлы электронных сообщений. В отличии от других почтовых клиентов (например, Outlook), Thunderbird не сохраняет всю информацию профиля в одном файле. Это папка с определённым набором файлов и папок, отвечающих за работу почтового клиента и сохранение его данных.
Профиль Thunderbird создаётся во время первого запуска программы и по умолчанию сохраняется в папке:
C:\Users\ИмяПользователя
\AppData\Roaming\Thunderbird\Profiles
В нашем случае, папка с файлами профиля имеет название q246yl6l.default
, где «q246yl6l»
– это произвольный, генерируемый самой программой набор символов.
Профиль пользователя Thunderbird состоит из определённого перечня файлов и папок, как:
-
abook.mab / history.mab
– файлы, которые содержат адресную книгу почтового клиента; -
cert8.db / key3.db / secmod.db
– файлы баз данных сертификатов и ключей сертификатов; -
localstore.rdf
– файл расположения и размера окон, которые определены пользователем; -
mailViews.dat
– файл режимов просмотра сообщений; -
panacea.dat
– файл кэша почтовых папок, с помощью которого отображается дерево папок почтового клиента; -
prefs.js
– основной конфигурационный файл Mozills Thunderbird;
и другие.
Кроме этих файлов, в папке профиля расположен определённый набор папок, среди которых можно выделить две:
Mail
– папка, в которой по умолчанию хранятся учётные записи почты POP3, причём файлы каждой учётной записи сохранены в отдельном подкаталоге.
ImapMail
– папка, в которой по умолчанию хранятся учётные записи почты IMAP. Файлы каждой учётной записи здесь также сохранены в отдельном подкаталоге.


Именно в этих двух папках хранится вся переписка пользователя, входящие и исходящие сообщения. Причём каждой папке почтового ящика предназначен отдельный *.msf файл, с таким же названием, которое имеет данная папка в самом почтовом клиенте и ящике электронной почты онлайн.
Creating a profile
After starting the Profile Manager as explained above, you can create a new, additional profile as follows:
- In the Profile Manager, click Create Profile… to start the Create Profile Wizard.
- Click Next and enter the name of the profile. Use a profile name that is descriptive, such as your personal name. This name is not exposed on the Internet.
- Disregard the Choose Folder prompt unless you wish to choose where to store the profile on your computer.
Warning: If you choose your own folder location for the profile, select a new or empty folder. If you choose a folder that isn’t empty and you later remove the profile and choose the «Delete Files» option, everything inside that folder will be deleted. - To create the new profile, click FinishDone.
You will be taken back to the Profile Manager and the new profile will be listed.
Создание профиля
После запуска Менеджера профилей, как описано выше, вы можете создать новый, дополнительный профиль, следующим образом:
- В Менеджере профилей щёлкните на Создать новый профиль…, чтобы запустить Мастер создания профиля.
- Щёлкните Далее и введите имя профиля. Используйте наглядное имя профиля, например, ваше имя. Это имя не раскрывается в Интернете.
- Игнорируйте сообщение Выбрать папку, если только не хотите выбрать, где хранить профиль на вашем компьютере.
Предупреждение: Если вы выберите ваше собственное расположение папки для профиля, выберите новую или пустую папку. Если вы выбрали непустую папку ипозже удалите профиль и используере опцию «Удалить файлы», всё содержимое папки будет удалено. - Чтобы создать новый профиль, щёлкните ЗавершитьГотово.
Вы будете перемещены обратно в Менеджер профилей, при этом в списке появится новый профиль.
Removing a profile
After starting the Profile Manager as explained above, you can remove an existing profile as follows:
- In the Profile Manager, select the profile to remove, and click Delete Profile….
- Confirm that you wish to delete the profile:
- Don’t Delete Files removes the profile from the Profile Manager yet retains the profile data files on your computer in the storage folder, so that your information is not lost. «Don’t Delete Files» is the preferred option because it saves the old profile’s folder and allows you to recover the files to a new profile.
- Delete Files removes the profile and its files (including the profile bookmarks, settings, passwords, etc.). If you use the «Delete Files» option, the profile folder and files will be deleted. This action cannot be undone.
- Cancel interrupts the profile deletion.
Удаление профиля
После запуска Менеджера профилей, как объяснено выше, вы можете удалить существующий профиль следующим образом:
- В Менеджере профилей выберите профиль для удаления и щёлкните Удалить….
- Подтвердите, что вы хотите удалить профиль:
- Не удалять файлы удаляет профиль из Менеджера профилей, но сохраняет файлы с данными профиля на вашем компьютере в папке хранения, так что ваша информация не будет потеряна. «Не удалять файлы» — предпочтительная опция, потому что сохраняет папку старого профиля и позволяет вам восстановить файлы в новом профиле.
- Удалить файлы удаляет профиль и его файлы (включая закладки профиля, настройки, пароли и т.д.). Если вы используете опцию «Удалить файлы», папка профиля и файлы будут удалены. Это действие невозможно отменить.
- Отмена прерывает удаление профиля.
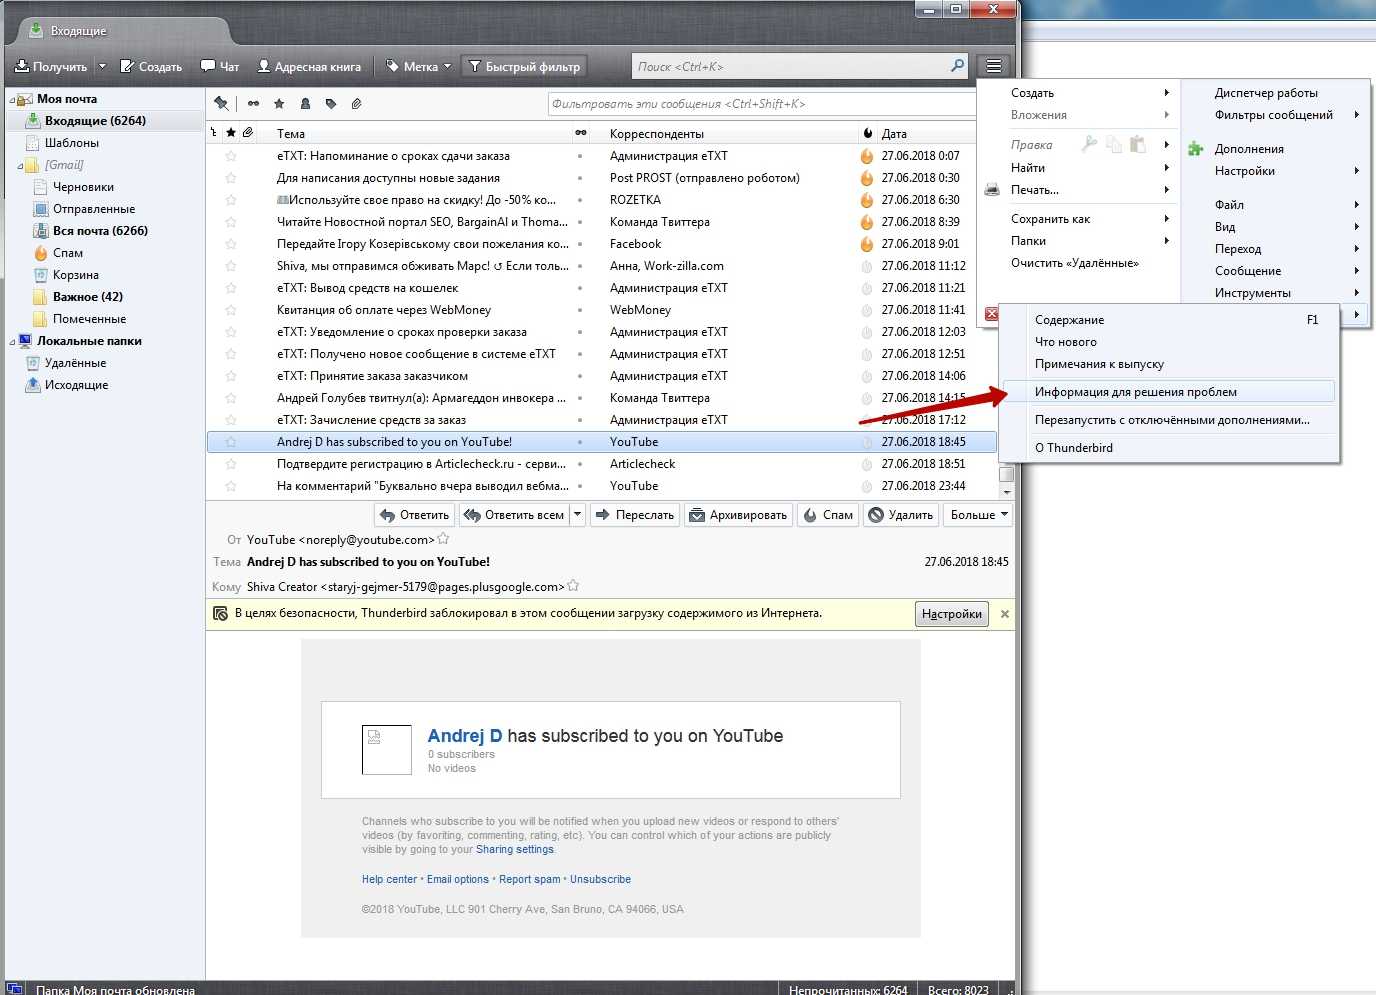
Finding your profile without opening Thunderbird
Thunderbird stores your profile folder in this location on your computer, by default:»C:\Users\<your Windows login username>\AppData\Roaming\Thunderbird\Profiles\»
Windows hides the AppData folder by default, but you can find your profile folder as follows:
- Press +R on the keyboard. A Run dialog will open.
- Type in:%APPDATA%\Thunderbird\Profiles\
- Click OK. A window will open containing profile folders.
- Double-click the profile folder you wish to open. If you only have one profile, its folder would have «default» in the name.
- From the Start Screen, click the Desktop tile. The Desktop view will open.
- From the Desktop, hover in the lower right-hand corner to access the Charms.
- Select the Search charm. The Search sidebar will open.
- In the search box, type in:%APPDATA%\Thunderbird\Profiles\ without pressing Enter. A list of profile folders will appear.
- Click on the profile folder you wish to open (it will open in a window). If you only have one profile, its folder would have «default» in the name.
- Click the Windows Start button. The Start menu will open.
- In the Search box at the bottom of the Start menu, type:%APPDATA%\Thunderbird\Profiles\ without pressing Enter. A list of profiles will appear at the top of the Start menu.
- Click on the profile folder you wish to open (it will open in a window). If you only have a single profile, its folder would have «default» in the name.
Alternatively, you can find your profile by pressing the key and then start typing: %APPDATA%\Thunderbird\Profiles\
Note: To set Windows to show the AppData folder and other hidden files and folders, see Show hidden files — Windows Help.
- Click the Windows Start button, and select Run….
- Type in:%APPDATA%\Thunderbird\Profiles\ then click OK. A window will open containing profile folders.
- Double-click the profile folder you wish to open. If you only have one profile, its folder would have «default» in the name.
- Click the Finder icon in the dock. On the menu bar, click the Go menu, hold down the option or alt key and select Library.
- Open the Thunderbird folder, and then the Profiles folder.
- Your profile folder is within this folder. If you only have one profile, its folder would have «default» in the name.
- (Ubuntu) Click the Places menu on the top right of the screen and select Home Folder. A File Browser window will appear.
- Click the View menu and select Show Hidden Files if it isn’t already checked.
- Double click the folder marked .thunderbird. Your profile folder is within this folder. If you only have one profile, its folder would have «default» in the name.
Backing up a profile
To back up your profile, first close Thunderbird if it is open and then copy the profile folder to another location.
- Locate your profile folder, as explained above.
- Shut down Thunderbird.
- Go to one level above your profile’s folder, i.e. to %APPDATA%\Thunderbird\Profiles\~/Library/Thunderbird/Profiles/~/.mozilla/Thunderbird/
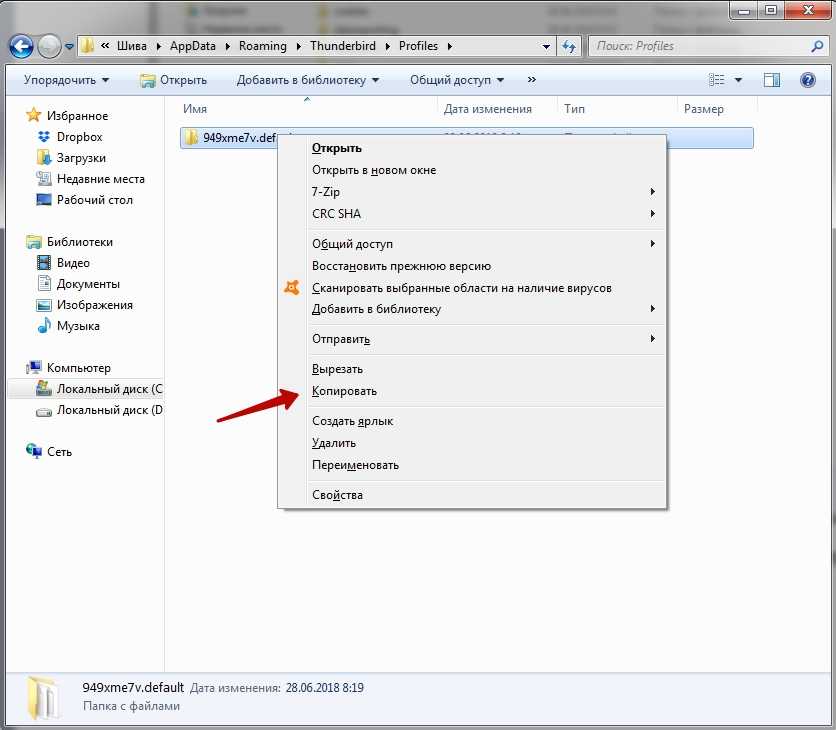
- Right-clickHold down the Ctrl key while you click on your profile folder (e.g. xxxxxxxx.default), and select Copy.
- Right-clickHold down the Ctrl key while you click the backup location (e.g. a USB-stick or a blank CD-RW disc), and select Paste item.
Restoring a profile backup
- Shut down Thunderbird.
- If your existing profile folder and profile backup folder have the same name, simply replace the existing profile folder with the profile backup, then start Thunderbird.
Important: The profile folder names must match exactly for this to work, including the random string of 8 characters. If the names do not match or if you are restoring a backup to a different location, follow the steps below.
Подборка Addons
Синхронизация. Работа с контактами:
- gContactSync — позволяет синхронизировать ваши Google контакты с Адресной Книгой Thunderbird в обе стороны.
- Addressbooks Synchronizer: Синхронизирует выбранный addressbooks с локальными файлами (соответственно файлам на сетевых дисках), с файлами через FTP или WebDAV (HTTP или HTTPS), с файлами в папках IMAP. Не реальный инструмент синхронизации, просто обмен файлами!
- Duplicate Contact Manager: появляется в адресной книге меню «Duplicates». Находит одинаковые (дубликаты) записи во всех адресных книгах и предлагает выбрать, какую из записей необходимо удалить.
Письма:
-
Auto Zip Attachments. Многие почтовые сервисы не позволяют отправлять письма с вложением большого объема. Обычно до 10 Мбайт на один вложенный файл (по разному бывает). При таких условиях приходиться архивировать файл перед отправкой. Auto Zip Attachments позволяет автоматизировать этот процесс. Плагин предлагает несколько режимов работ:
- так, могут быть заархивированы либо все вложения без исключения,
- либо имеющие определенное расширение,
- либо файлы больше указанного объема.
Помимо этого можно настроить расширение таким образом, чтобы не архивировались те файлы, размер которых после сжатия будет немногим отличаться от оригинального (порог указывается в процентах).
- Signature Switch. При отсылки Email желательно, чтобы в конце письма стояла подпись с данными об отправителе. В Thunderbird можно сделать только одну подпись для каждой учетной записи. С помощью этого плагина можно создать несколько подписей на все случаи жизни. Каждая подпись должна быть сохранена в виде текстового файла или HTML-файла, путь к которому нужно указать в настройках плагина. При этом подписи могут автоматически добавляться к письмам, отправляемым на оперделенные адреса или группы адресов: если перед ‘@’ поставить знак вопроса ? (например, ?@example.com), то подпись будет использована при отправке всех писем на адреса, принадлежащие домену example.com. Также подписи можно добавить с помощью горячих клавиш или кнопки (кнопку можно добавить через меню Вид>Панель инструментов>Настроить…).
-
AttachmentExtractor
Органайзер:
Lightning. Дополнение Lightning добавляет в почтовый клиент от Mozilla удобный календарь, практически ни в чем не уступающий аналогичному в Microsoft Outlook. Расширение предоставляет пользователю органайзер (календарь и задачи), позволяет отображать напоминания и умеет выводить информацию о ближайших делах в удобной боковой панели. Кроме того, календарь можно разместить на веб-сервере — тогда работать с ним благодаря протоколу WebDAV смогут сразу несколько пользователей.
Совместную работу и доступ к запланированным задачам с любого компьютера можно организовать и другим путем — используя для этого календарный сервис от Google. Зайдите в свой аккаунт Google, перейдите к календарям, откройте меню «Настройки | Календари» и выберите нужный. В самой нижней части экрана, в разделе «Закрытый адрес календаря», щелкните по кнопке «ХМL» и скопируйте ссылку из появившегося окна. Затем откройте календарь в Mozilla Thunderbird, кликните в списке календарей по пустому месту правой кнопкой мыши и выберите пункт «Новый календарь | В сети». В следующем окне отметьте «Календарь Google» и вставьте в поле «Адрес» скопированную ссылку. После этого остается только ввести логин и пароль — и календарь готов к работе. Теперь при нажатии на кнопку «Обновить» в верхней панели будет происходить синхронизация локального и удаленного календарей. При желании можно настроить и автоматическую синхронизацию.
Однако у Lightning есть один минус, который вряд ли понравится тем, кто привык синхронизировать календарь на ПК с мобильным устройством: настроить данную функцию можно только с помощью программы OggSync (www.oggsync.com). Данное приложение позволяет синхронизировать календарь в КПК с календарем Google. Таким образом, в цепочку действий ПК-КПК добавляется лишний элемент.
Finding your profile without opening Thunderbird
Thunderbird stores your profile folder in this location on your computer, by default:»C:\Users\<your Windows login username>\AppData\Roaming\Thunderbird\Profiles\»
Windows hides the AppData folder by default, but you can find your profile folder as follows:
- Press +R on the keyboard. A Run dialog will open.
- Type in:%APPDATA%\Thunderbird\Profiles\
- Click OK. A window will open containing profile folders.
- Double-click the profile folder you wish to open. If you only have one profile, its folder would have «default» in the name.
- From the Start Screen, click the Desktop tile. The Desktop view will open.
- From the Desktop, hover in the lower right-hand corner to access the Charms.
- Select the Search charm. The Search sidebar will open.
- In the search box, type in:%APPDATA%\Thunderbird\Profiles\ without pressing Enter. A list of profile folders will appear.
- Click on the profile folder you wish to open (it will open in a window). If you only have one profile, its folder would have «default» in the name.
- Click the Windows Start button. The Start menu will open.
- In the Search box at the bottom of the Start menu, type:%APPDATA%\Thunderbird\Profiles\ without pressing Enter. A list of profiles will appear at the top of the Start menu.
- Click on the profile folder you wish to open (it will open in a window). If you only have a single profile, its folder would have «default» in the name.
Alternatively, you can find your profile by pressing the key and then start typing: %APPDATA%\Thunderbird\Profiles\
Note: To set Windows to show the AppData folder and other hidden files and folders, see Show hidden files — Windows Help.
- Click the Windows Start button, and select Run….
- Type in:%APPDATA%\Thunderbird\Profiles\ then click OK. A window will open containing profile folders.
- Double-click the profile folder you wish to open. If you only have one profile, its folder would have «default» in the name.
- Click the Finder icon in the dock. On the menu bar, click the Go menu, hold down the option or alt key and select Library.
- Open the Thunderbird folder, and then the Profiles folder.
- Your profile folder is within this folder. If you only have one profile, its folder would have «default» in the name.
- (Ubuntu) Click the Places menu on the top right of the screen and select Home Folder. A File Browser window will appear.
- Click the View menu and select Show Hidden Files if it isn’t already checked.
- Double click the folder marked .thunderbird. Your profile folder is within this folder. If you only have one profile, its folder would have «default» in the name.
Backing up a profile
To back up your profile, first close Thunderbird if it is open and then copy the profile folder to another location.
- Locate your profile folder, as explained above.
- Shut down Thunderbird.
- Go to one level above your profile’s folder, i.e. to %APPDATA%\Thunderbird\Profiles\~/Library/Thunderbird/Profiles/~/.mozilla/Thunderbird/
- Right-clickHold down the Ctrl key while you click on your profile folder (e.g. xxxxxxxx.default), and select Copy.
- Right-clickHold down the Ctrl key while you click the backup location (e.g. a USB-stick or a blank CD-RW disc), and select Paste item.
Restoring a profile backup
- Shut down Thunderbird.
- If your existing profile folder and profile backup folder have the same name, simply replace the existing profile folder with the profile backup, then start Thunderbird.
Important: The profile folder names must match exactly for this to work, including the random string of 8 characters. If the names do not match or if you are restoring a backup to a different location, follow the steps below.
Цифровая подпись
Когда вы подписываете сообщение цифровой подписью, вы встраиваете в сообщение информацию, которая подтверждает вашу личность. Это делается посредством использования цифрового сертификата для подписи ваших сообщений. Для получения дополнительной информации прочитайте статью Цифровая подпись и шифрование сообщений.


Подписывать сообщения цифровой подписью (по умолчанию): Включите этот параметр, чтобы заставить Thunderbird автоматически подписывать ваши сообщения с выбранного выше сертификата. Если этот параметр не включен, вы можете подписать сообщение в окне составления, перейдя в меню Настройки и выбрав Подписать это сообщение.