
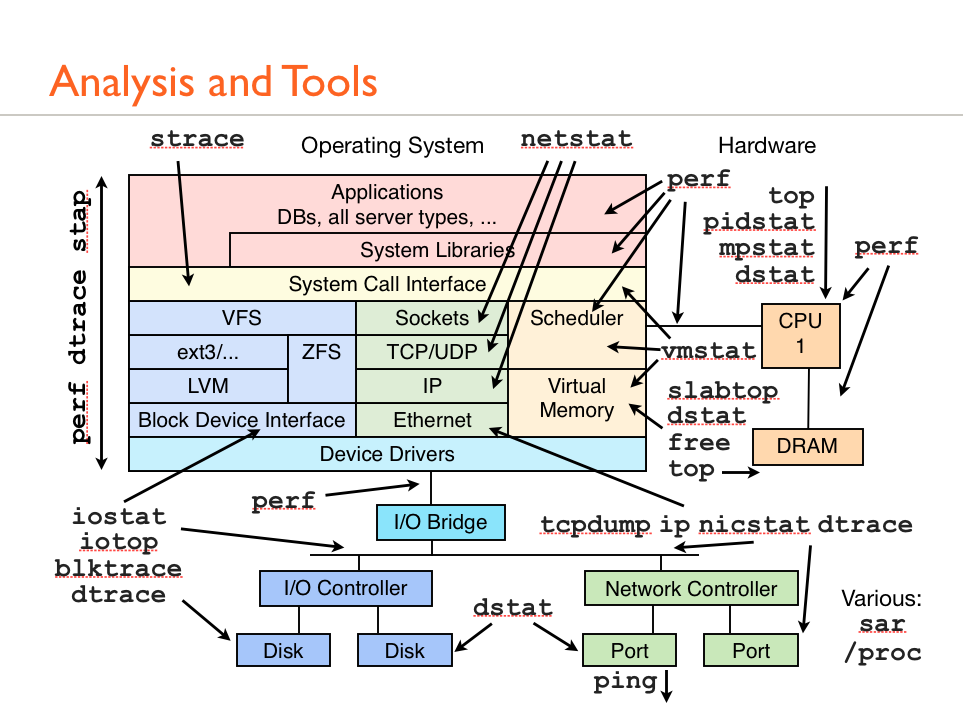
Preparing Disk Partitions
Disk partitions are created using . We will create three partitions of 1 GB each, though identical sized partitions are not mandatory. Also, the partitions are created as type to make them compatible with LVM.
# fdisk /dev/sdb\r\n
Command (m for help): n ## new
Command action
   e   extended
   p   primary partition (1-4)
p ## primary

Partition number (1-4): 1 ## partition number
First cylinder (1-1044, default 1):  ## hit enter
Last cylinder, +cylinders or +size{K,M,G} (1-1044, default 1044): +1G ## size

Command (m for help): t ## change type
Selected partition 1
Hex code (type L to list codes): 8e ## code for LVM
Changed system type of partition 1 to 8e (Linux LVM)
We repeat the same steps to create two other partitions. After the partitions are created, we should get an output similar to this:
# fdisk -l
   Device Boot      Start         End      Blocks   Id  System
/dev/sdb1               1         132     1060258+  8e  Linux LVM
/dev/sdb2             133         264     1060290   8e  Linux LVM
/dev/sdb3             265         396     1060290   8e  Linux LVM
Expanding a filesystem on the fly
I always like to run new distributions in a VirtualBox virtual machine for a few days or weeks to ensure that I will not run into any devastating problems when I start installing it on my production machines. One morning a couple years ago I started installing a newly released version of Fedora in a virtual machine on my primary workstation. I thought that I had enough disk space allocated to the host filesystem in which the VM was being installed. I did not. About a third of the way through the installation I ran out of space on that filesystem. Fortunately, VirtualBox detected the out-of-space condition and paused the virtual machine, and even displayed an error message indicating the exact cause of the problem.
Note that this problem was not due to the fact that the virtual disk was too small, it was rather the logical volume on the host computer that was running out of space so that the virtual disk belonging to the virtual machine did not have enough space to expand on the host’s logical volume.
Since most modern distributions use Logical Volume Management by default, and I had some free space available on the volume group, I was able to assign additional disk space to the appropriate logical volume and then expand filesystem of the host on the fly. This means that I did not have to reformat the entire hard drive and reinstall the operating system or even reboot. I simply assigned some of the available space to the appropriate logical volume and resized the filesystem—all while the filesystem was on-line and the running program, The virtual machine was still using the host filesystem. After resizing the logical volume and the filesystem I resumed running the virtual machine and the installation continued as if no problems had occurred.
Although this type of problem may never have happened to you, running out of disk space while a critical program is running has happened to many people. And while many programs, especially Windows programs, are not as well written and resilient as VirtualBox, Linux Logical Volume Management made it possible to recover without losing any data and without having to restart the time-consuming installation.
Install LVM GUI utility
The utility that we will be using to perform the job is “system-config-lvm” from Redhat. as this utility has been repackaged for Ubuntu, the only difference between the two, is how you install it.
On CentOS
You can install the package using the CLI, by issuing in a terminal:
Once installed, you can issue the utility name with sudo for admin rights to launch it:
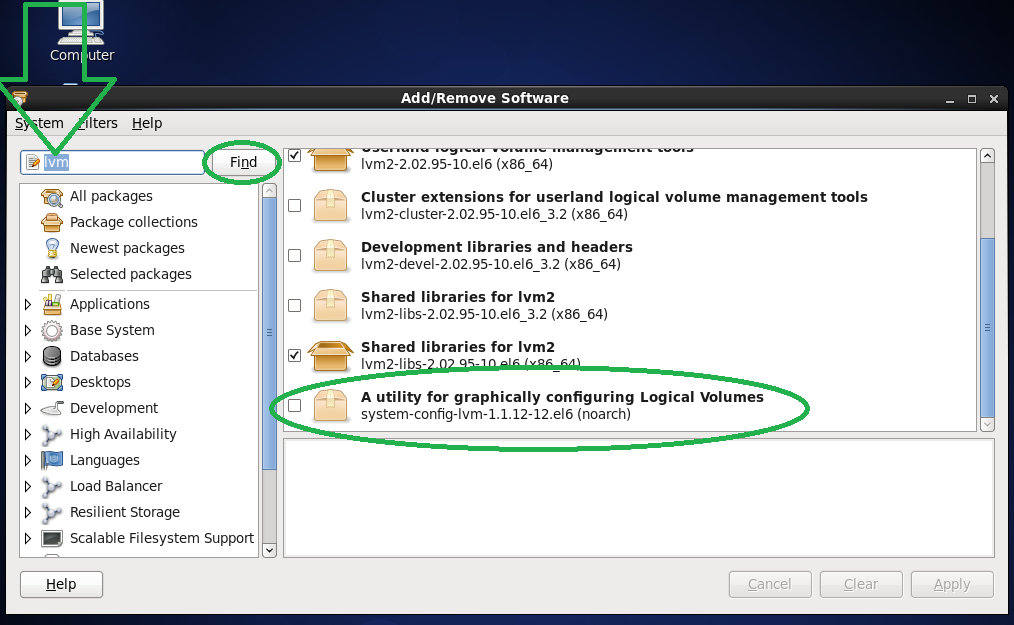
Alternatively, You may wish to install the package using the graphical package manager. To do that, go to “system” -> “Administration” -> “Add/Remove Software”.
Search for “LVM” in the filter box to find the “system-config-lvm” utility down at the bottom.
Select the checkbox and “Next -> Next -> Finish” to accept the installation and it’s key. Once installed (this is true for the CLI way as well), the program will appear under “System” -> “Administration” -> “Logical Volume Management”.
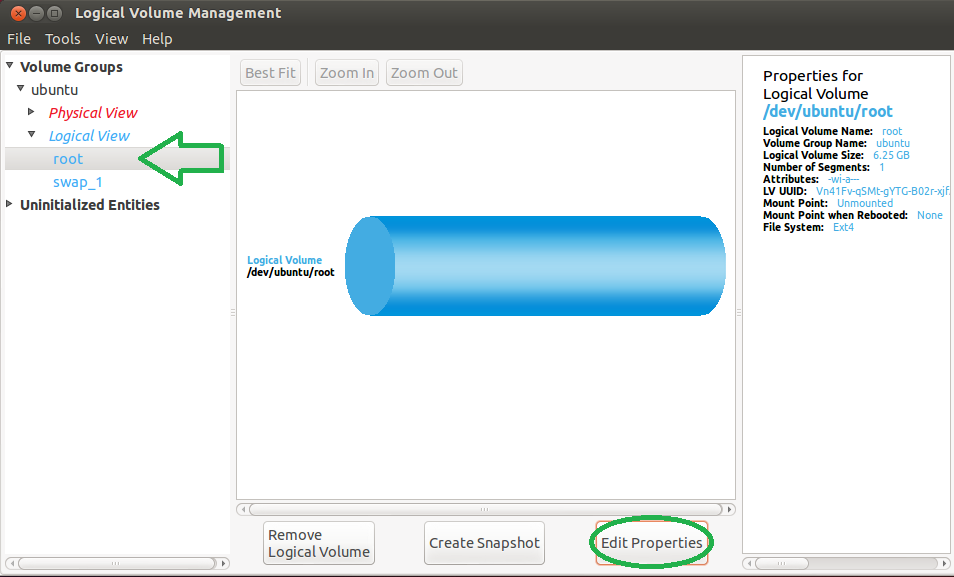
Click It to Open the program. At this point you may skip to the “Using” segment at the bottom.
On Ubuntu
The newest version of Ubuntu (12.10 at the time of this writing), now ships with LVM as an integral part. That is good news, because on previous releases, while you could install the system-config-lvm utility, you would also have to install about 180MB worth of missing LVM stuff with it. This would make the “just get in and out with a live CD” use case a bit slower. Moreover you had to issue a manual command so that all of the functions of the utility, namely the filesystem re-sizing, would work.
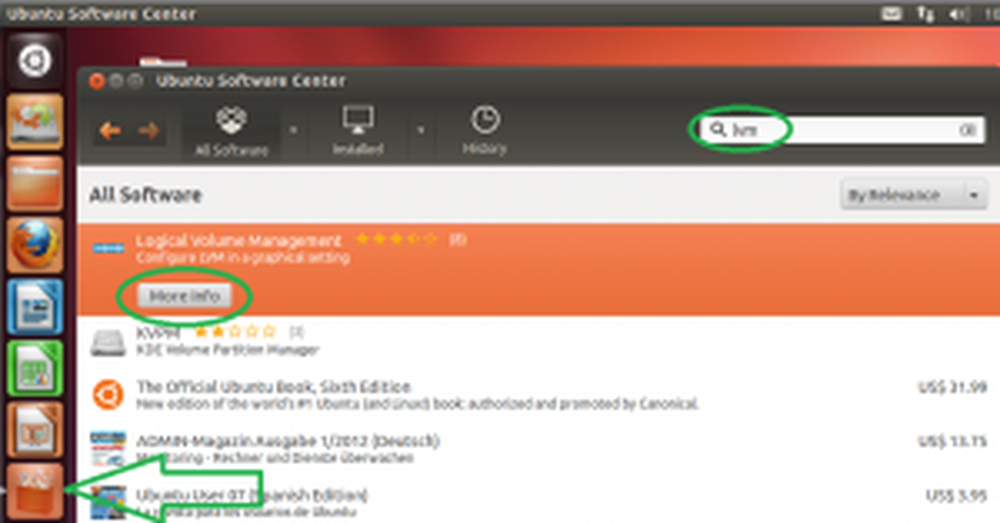
Open the “Ubuntu software center” and look for “LVM”.
Click on the “Logical Volume management” row and then click “More info”.
Because the LVM utility comes from the Linux “Universe”, we have to first enable the repository by clicking on “Use This Source”. Once the resource is enabled and the package manager has been updated (have patience as this may take a short while), you will get the option to install the program. Click “install”.
Once installed, if you are running a version earlier then 12.10, you’re gonna want to drop to a shell to issue the following single command, which will enable the utility’s filesystem re-sizing ability.
Now you can open the program by clicking its icon.
Troubleshooting
LVM commands do not work
Load proper module:
# modprobe dm_mod
The module should be automatically loaded. In case it does not, explicitly load the module at boot.
Try preceding commands with lvm like this:
# lvm pvdisplay
Logical Volumes do not show up
If you are trying to mount existing logical volumes, but they do not show up in , you can use the following commands to activate them:
# vgscan
# vgchange -ay
LVM on removable media
Symptoms:
# vgscan
  Reading all physical volumes.  This may take a while...
  /dev/backupdrive1/backup: read failed after 0 of 4096 at 319836585984: Input/output error
  /dev/backupdrive1/backup: read failed after 0 of 4096 at 319836643328: Input/output error
  /dev/backupdrive1/backup: read failed after 0 of 4096 at 0: Input/output error
  /dev/backupdrive1/backup: read failed after 0 of 4096 at 4096: Input/output error
  Found volume group "backupdrive1" using metadata type lvm2
  Found volume group "networkdrive" using metadata type lvm2
Cause: removing an external LVM drive without deactivating the volume group(s) first. Before you disconnect, make sure to:
# vgchange -an volume group name
Fix: assuming you already tried to activate the volume group with , and are receiving the Input/output errors:
# vgchange -an volume group name
Unplug the external drive and wait a few minutes:
# vgscan
# vgchange -ay volume group name
Suspend/resume with LVM and removable media
The factual accuracy of this article or section is disputed.
Reason: Provided solution will not work in more complex setups like LUKS on LVM. (Discuss in )
In order for LVM to work properly with removable media – like an external USB drive – the volume group of the external drive needs to be deactivated before suspend. If this is not done, you may get buffer I/O errors on the dm device (after resume). For this reason, it is not recommended to mix external and internal drives in the same volume group.

![Lvm (logical volume manager) [мозаика системного администрирования]](http://tehnik-shop.ru/wp-content/uploads/a/2/c/a2ca78f7eb612e0a098f63079168a9c4.jfif)

To automatically deactivate the volume groups with external USB drives, tag each volume group with the tag in this way:
# vgchange --addtag sleep_umount vg_external
Once the tag is set, use the following unit file for systemd to properly deactivate the volumes before suspend. On resume, they will be automatically activated by LVM.
/etc/systemd/system/ext_usb_vg_deactivate.service
Description=Deactivate external USB volume groups on suspend
Before=sleep.target


Type=oneshot
ExecStart=-/etc/systemd/system/deactivate_sleep_vgs.sh


WantedBy=sleep.target
and this script:
/etc/systemd/system/deactivate_sleep_vgs.sh
#!/bin/sh

TAG=@sleep_umount
vgs=$(vgs --noheadings -o vg_name $TAG)

echo "Deactivating volume groups with $TAG tag: $vgs"

# Unmount logical volumes belonging to all the volume groups with tag $TAG
for vg in $vgs; do
    for lv_dev_path in $(lvs --noheadings  -o lv_path -S lv_active=active,vg_name=$vg); do
        echo "Unmounting logical volume $lv_dev_path"
        umount $lv_dev_path
    done
done

# Deactivate volume groups tagged with sleep_umount
for vg in $vgs; do
    echo "Deactivating volume group $vg"
    vgchange -an $vg
done
Finally, enable the unit.
Resizing a contiguous logical volume fails
If trying to extend a logical volume errors with:
" Insufficient suitable contiguous allocatable extents for logical volume "
/etc/lvm/lvm.conf
thin_check_options =
See .
Snapshots
LVM supports CoW (Copy-on-Write) snapshots. A CoW snapshot initially points to the original data. When data blocks are overwritten, the original copy is left intact and the new blocks are written elsewhere on-disk. This has several desirable properties:
- Creating snapshots is fast, because it does not copy data (just the much shorter list of pointers to the on-disk locations).
- Snapshots require just enough free space to hold the new data blocks (plus a negligible amount for the pointers to the new blocks). For example, a snapshot of 35 GiB of data, where you write only 2 GiB (on both the original and snapshot), only requires 2 GiB of free space.
LVM snapshots are at the block level. They make a new block device, with no apparent relationship to the original except when dealing with the LVM tools. Therefore, deleting files in the original copy does not free space in the snapshots. If you need filesystem-level snapshots, you rather need btrfs, ZFS or bcache.
Warning:
- A CoW snapshot is not a backup, because it does not make a second copy of the original data. For example, a damaged disk sector that affects original data also affects the snapshots. That said, a snapshot can be helpful while using other tools to make backups, as outlined .
Configuration
You create snapshot logical volumes just like normal ones.
# lvcreate --size 100M --snapshot --name snap01vol /dev/MyVolGroup/lvol
With that volume, you may modify less than 100 MiB of data, before the snapshot volume fills up.
Reverting the modified logical volume to the state when the snapshot was taken can be done with
# lvconvert --merge /dev/MyVolGroup/snap01vol
In case the origin logical volume is active, merging will occur on the next reboot (merging can be done even from a LiveCD).
Note: The snapshot will no longer exist after merging.
Also multiple snapshots can be taken and each one can be merged with the origin logical volume at will.
Backups
A snapshot provides a frozen copy of a file system to make backups. For example, a backup taking two hours provides a more consistent image of the file system than directly backing up the partition.
The snapshot can be mounted and backed up with dd or tar. The size of the backup file done with dd will be the size of the files residing on the snapshot volume.
To restore just create a snapshot, mount it, and write or extract the backup to it. And then merge it with the origin.
See Create root filesystem snapshots with LVM for automating the creation of clean root file system snapshots during system startup for backup and rollback.
This article or section needs expansion.
Задание 2 (Эмуляция отказа одного из дисков)
- Если вы поставили галочку hot swap, то вам доступно удаление дисков на лету:
- Выполните удаление диска ssd1 в свойствах машины.
- Найдите директорию, где хранятся файлы вашей виртуальной машины и удалите ssd1.vmdk.
- Убедитесь что ваша виртуальная машина по-прежнему работает
- Выполните перезагрузку виртуальной машины и убедитесь что она по-прежнему работает
- Проверьте статус RAID-массива:
- Добавьте в интерфейсе VM новый диск такого же размера и назовите его ssd3.
- Выполните операции:
- Посмотрите что новый диск приехал в систему командой
- Скопируйте таблицу разделов со старого диска на новый:
- Посмотрите результат командой
- Добавьте в рейд массив новый диск:
- Посмотрите результат: . Вы должны увидеть что началась синхронизация
-
Теперь нужно вручную выполните синхронизацию разделов, не входящих в RAID. Для этого воспользуемся утилитой dd, скопировав с «живого» диска на новенький, который вы недавно поставили:
- После завершения синхронизации установите grub на новый диск.
- Выполните перезагрузку ВМ, для того чтобы убедиться что все работает.
Опишите своими словами что вы сделали и какой результат получили в итоге проделанного задания.
Результат: удалён диск ssd1, сохранен диск ssd2, добавлен диск ssd3.
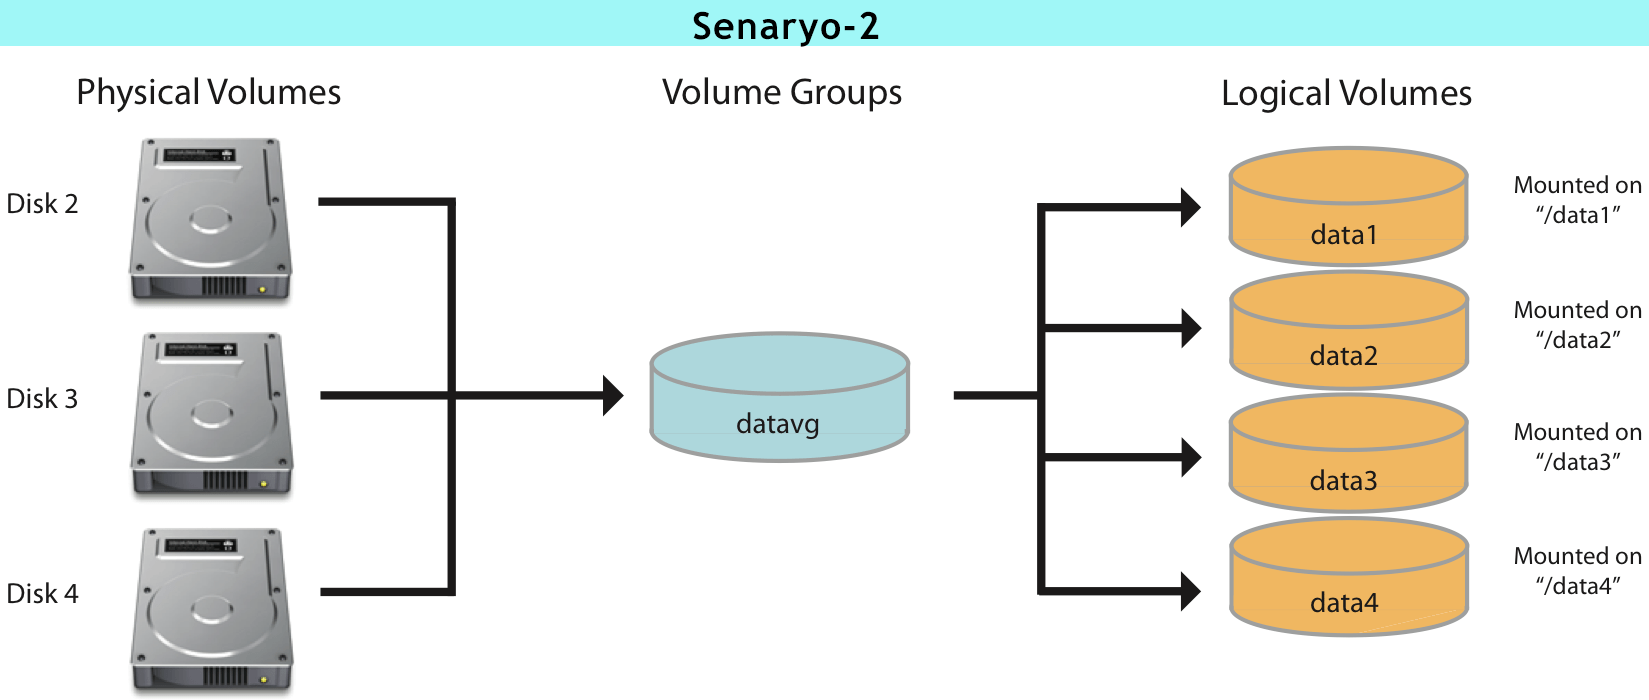
2. Managing LVM Volume Groups
Physical volumes are combined into volume groups (VG) or A VG is a collection of physical volumes of varying sizes and types. I have re-added the deleted PV using the command
2.1 Create Volume Group
We can create a volume group from one or more physical volumes. In the below example, I have created a VG named using our physical volumes. is the utility used to create VG.
# vgcreate new_vg /dev/sdb1 /dev/sdc1
  Volume group "new_vg" successfully created
The VG has been created with 2 PVs. The following commands are used to search and Display volume group information.
# vgscan
  Found volume group "new_vg" using metadata type lvm2

# vgs
  VG     #PV #LV #SN Attr   VSize  VFree
  new_vg   2   0   0 wz--n- 19.99g 19.99g
Sample Output:
Advertisement
2.2 Rename Volume Group
All VGs visible to a system need to have different names. Otherwise, many LVM commands will refuse to run or give warning messages. command is used to rename the existing VG.
# vgrename new_vg new1_vg
  Volume group "new_vg" successfully renamed to "new1_vg"

# vgscan
  Found volume group "new1_vg" using metadata type lvm2
The above command will rename the VG named to a new name has found the new volume group «new1_vg»
2.3 Remove Physical Volume from a Volume Group
command is used to remove unwanted/unused PVs from a Volume Group. The removed physical volumes can be used in different VG.
Before removing a physical volume from a volume group, you need to make sure that the physical volume is not used by any logical volumes by displaying the information in command.
In the below example, I have removed the PV /dev/sdc1
# vgreduce new1_vg /dev/sdc1
  Removed "/dev/sdc1" from volume group "new1_vg"

# Run pvs to confirm
# pvs
  PV         VG      Fmt  Attr PSize   PFree
  /dev/sdb1  new1_vg lvm2 a--  <10.00g <10.00g
  /dev/sdc1          lvm2 ---  <10.00g <10.00g
2.4 Add Physical Volumes to a Volume Group
command is used to add one or more initialized physical volumes to an existing volume group to extend it in size. In other words, allows us to re-add the physical volumes missing for any reason.

In the example, I have re-added the physical volume to our volume group that we had removed in the previous section
# vgextend new1_vg /dev/sdc1
  Volume group "new1_vg" successfully extended

# Run vgs or pvs to confirm

# vgs
  VG      #PV #LV #SN Attr   VSize  VFree
  new1_vg   2   0   0 wz--n- 19.99g 19.99g

# pvs
  PV         VG      Fmt  Attr PSize   PFree
  /dev/sdb1  new1_vg lvm2 a--  <10.00g <10.00g
  /dev/sdc1  new1_vg lvm2 a--  <10.00g <10.00g
2.5 Remove Volume Group
command allows us to delete the volume group that contains no logical volumes. In this example, I am going to delete the volume group new1_vg where we have not created any logical volumes.
# vgremove new1_vg
  Volume group "new1_vg" successfully removed

# Confirm the VG has been removed

# vgdisplay new1_vg
  Volume group "new1_vg" not found
  Cannot process volume group new1_vg
2.6 Activating and Deactivating Volume Group
The volume group will be activated by default when it’s created. We can deactivate or activate a volume group using We can deactivate individual logical volumes with the command. We can discuss this in the next section.
# To Deactivate VG
# vgchange -a n new1_vg

# To Activate VG
# vgchange -a y new1_vg
Информация о дисках
Как перенести группу томов LVM в другую систему
ВНИМАНИЕ
Данная лабораторная работа связана с такой тонкой материей как сохранность данных — это такая область, которая позволяет из-за мельчайшей ошибки — одной лишней буквы или цифры потерять все ваши данные.
Поскольку вы выполняете лабораторную работу вам ничего не грозит, разве что придется начать делать ее заново.
В реальной жизни все гораздо серьезнее, поэтому следует очень внимательно вводить имена дисков, понимая что именно вы выполняете текущей командой и с какими дисками работаете.
Второй важный момент — именование дисков и разделов: в зависимости от ситуации номера дисков могут отличаться от тех значений, что представлены в командах в лабораторной работе.
Так, например, если удалить диск sda из массива, а затем добавить новый диск, то новый диск будет отображаться в системе с именем sda. Если же выполнить перезагрузку перед добавлением нового диска, то новый диск будет иметь имя sdb, а старый станет именоваться sda
Лабораторная работа должна выполняться под суперпользователем (root) поскольку большая часть команд требует повышенных привилегий и не имеет смысла постоянно повышать привилегии через sudo.
Создание LVM разделов
Подключить сетевой диск
Расскажу, как быстро выполнить монтирование наиболее популярных сетевых дисков:
- по smb
- по nfs
В общем случае, подключить сетевой диск по smb можно следующей командой.
# mount -t cifs //10.1.4.4/backup /mnt/backup -o user=admin,password=passadmin
| 10.1.4.4/backup | сетевая шара |
| /mnt/backup | локальная директория, куда монтируем сетевой диск |
| admin | пользователь |
| passadmin | пароль |
Если команда не отработает и будет ошибка, установите отдельно cifs-utils.
# apt install cifs-utils
С монтированием по smb есть куча нюансов. Сколько различных ошибок я ловил при этом — не счесть. То кодировка не совпадает, то в пароле спец. символы, то шара в домене и надо правильно указать домен. Если в пароле есть спец. символы, пароль можно взять в одинарные кавычки. Домен можно указать через слеш, через плюс, через @. Пробуйте разные варианты, если не получается. Так же имя пользователя с доменом можно тоже брать в кавычки, иногда помогает. Например, вот так — ‘domain\admin’
Так же обращайте внимание на версию протокола smb. Ее можно принудительно указывать через опцию vers
Так же можно вывести более подробный лог подключения.
# mount -t cifs -vvv //10.1.4.4/backup /mnt/backup -o vers=2.1,user=admin,password=passadmin
Для подключения сетевого диска по nfs, необходимо установить на машину nfs-client, который находится в пакете nfs-common.
# apt install nfs-common
После этого можете подключить сетевую папку по nfs:
# mount -t nfs 10.1.4.4:/backup /mnt/backup
С nfs, так же как и с cifs, можно вывести расширенный лог и принудительно указать версию.
# mount -t nfs -vvv -overs=2 10.1.4.4:/backup /mnt/backup
Перед подключением диска можете проверить, а если вам вообще доступ к сетевому диску на сервере:
# showmount --exports 10.1.4.4
Вы должны увидеть список nfs дисков, к которым у вас есть доступ. Если список пуст, подмонтировать ничего не получится.
Вступление
О логическом томе V или M LVM уже рассказывалось о HTG, а также о том, почему вы должны его использовать. По мере того, как LVM становится все более популярным, где некоторые из основных игроков дистрибутивов, такие как CentOS и Ubuntu с их последней версией 12.10, теперь устанавливаемые на LVM по умолчанию, вы можете столкнуться с этим раньше, чем вы думаете. С учетом вышесказанного, вероятно, пройдет немного времени, прежде чем вы захотите администрировать LVM, например, увеличить пространство, доступное на томе … с учетом сказанного, что может быть приятнее, чем иметь хороший графический интерфейс для сделать работу? Ничего, поэтому давайте установим один.
Increase capacity
You can add storage capacity to the Logical Volume. This is useful if the users consume more space than you anticipated. The process is pretty logical:
- Add a disk and configure it as a PV.
- Add it to a VG.
- Add the capacity to the LV and then extend the filesystem.
1. Install a storage disk and then configure it as a PV
To increase capacity, install a new disk and configure it as a PV, as per the steps above. If there is already a disk with free space available, you can certainly use that, as well.
Here is a reminder of the command to create a PV:
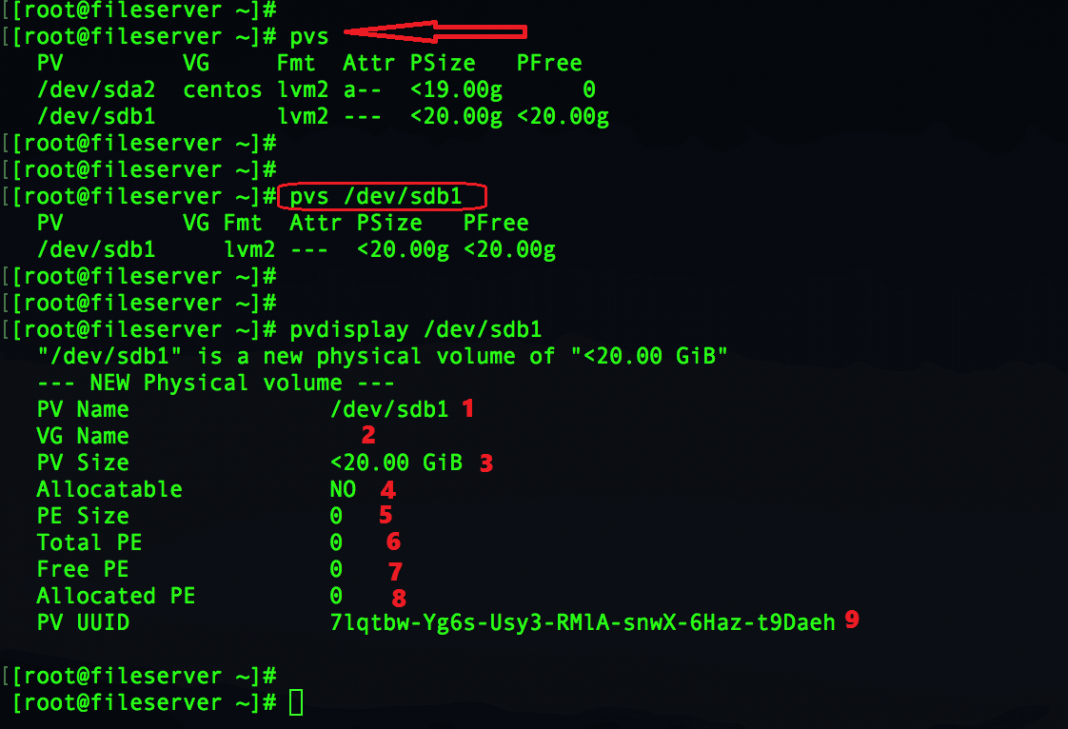
In this case, I am designating partition 2 on disk as the new PV.
2. Add space to the VG
Once the new capacity is designated for LVM, you can add it to the VG, increasing the pool’s size.
Run this command to add a new PV to an existing VG:
Now the storage pool is larger. The next step is to add the increased capacity to the specific Logical Volume. You can allocate any or all of the PV storage space you just added to the pool to the existing LV.
3. Add space to the LV
Next, add some or all of the new VG storage space to the LV that needs to be expanded.
Run the command to extend the LV to a given size:
Run the command to add 1 GB of space to the existing size:
4. Extend the file system to make the storage capacity available
Finally, extend the file system. Both ext4 and XFS support this ability, so either filesystem is fine.
Unmount the filesystem by using the command:
Here is the basic command for ext4:
Creating File system
The final step is to create a file system on the new LV we just created and mount it on a directory to be able to access it and store data in it. The command mkfs can be used to create file system on top of the LV.
# mkfs.ext4 /dev/vg01/lvol01
mke2fs 1.41.12 (17-May-2010)
Filesystem label=
OS type: Linux
Block size=4096 (log=2)
Fragment size=4096 (log=2)
Stride=0 blocks, Stripe width=0 blocks
65536 inodes, 262144 blocks
13107 blocks (5.00%) reserved for the super user
First data block=0
Maximum filesystem blocks=268435456
8 block groups
32768 blocks per group, 32768 fragments per group
8192 inodes per group
Superblock backups stored on blocks:
	32768, 98304, 163840, 229376

Writing inode tables: done
Creating journal (8192 blocks): done
Writing superblocks and filesystem accounting information: done

This filesystem will be automatically checked every 37 mounts or
180 days, whichever comes first.  Use tune2fs -c or -i to override.
The logical volume can be mounted, once the file system is created. Make sure to add an entry to /etc/fstab, so that it is mounted automatically when the system boots.
# mkdir /data01
# mount /dev/vg01/lvol01 /data01
# vi /etc/fstab
/dev/vg01/lvol01	/data01			ext4	defaults	0 0
# df -h /data01
Filesystem                   Size  Used  Avail  Use%  Mounted on
/dev/mapper/vg01-lvol01     1008M   34M  924M   4%    /data01
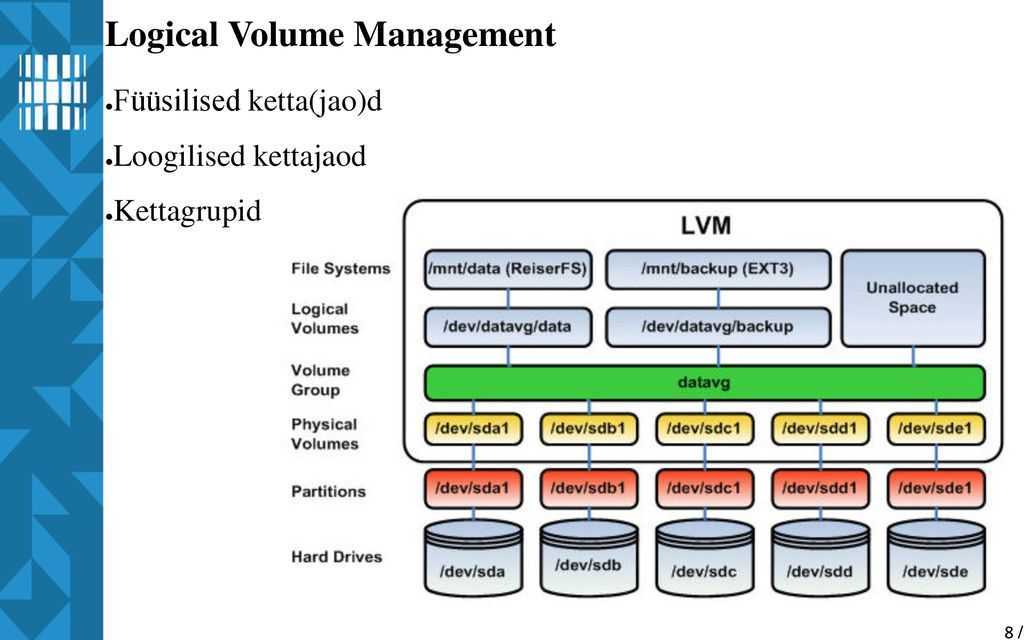
Overview on Logical Volume Manager
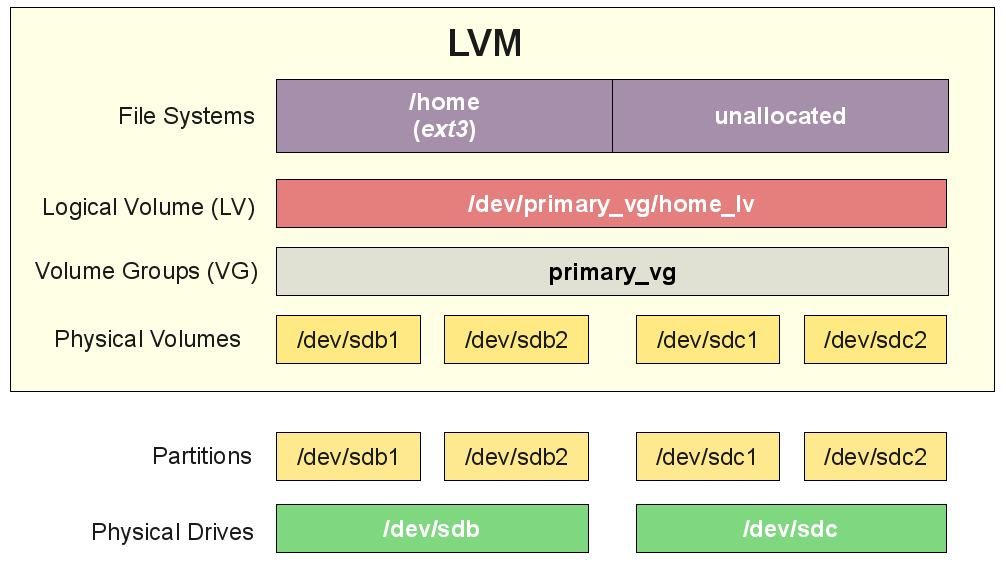
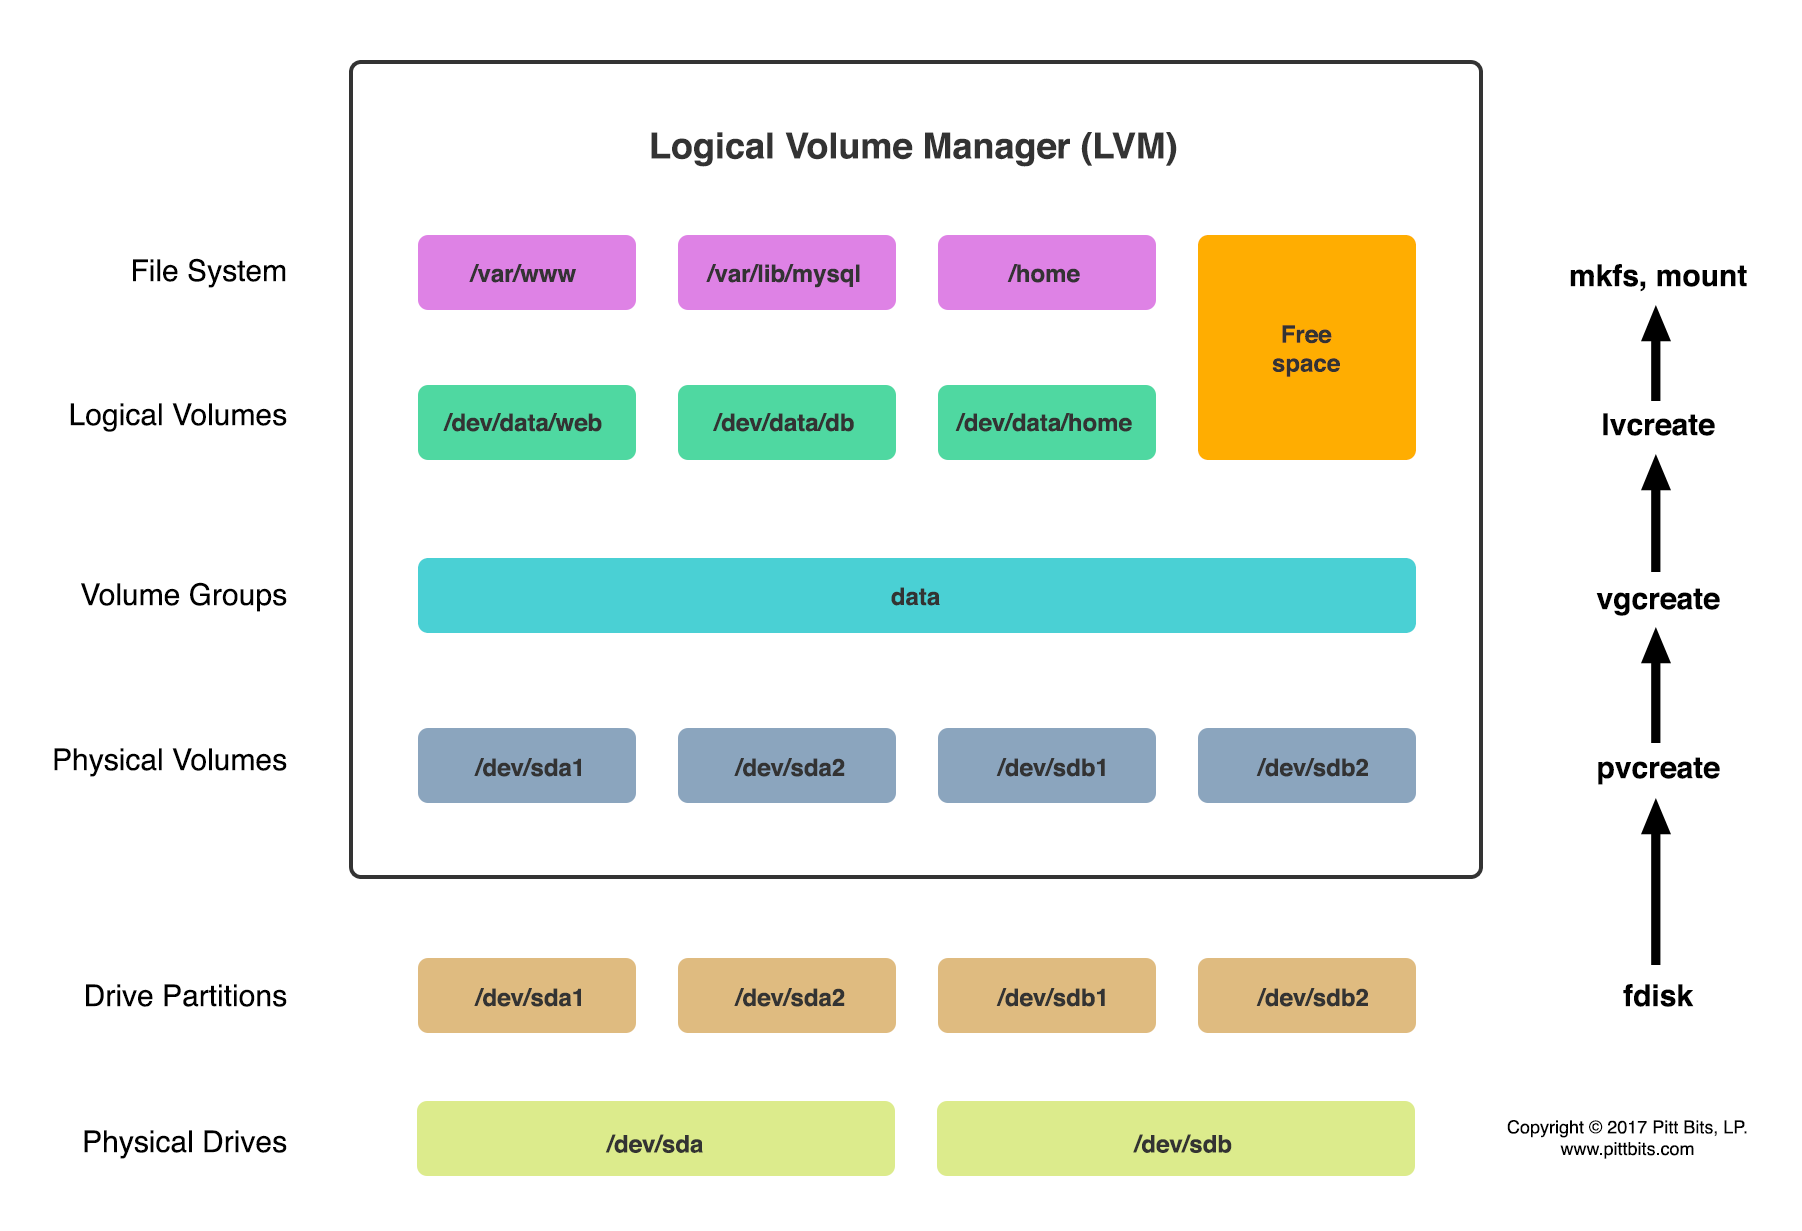
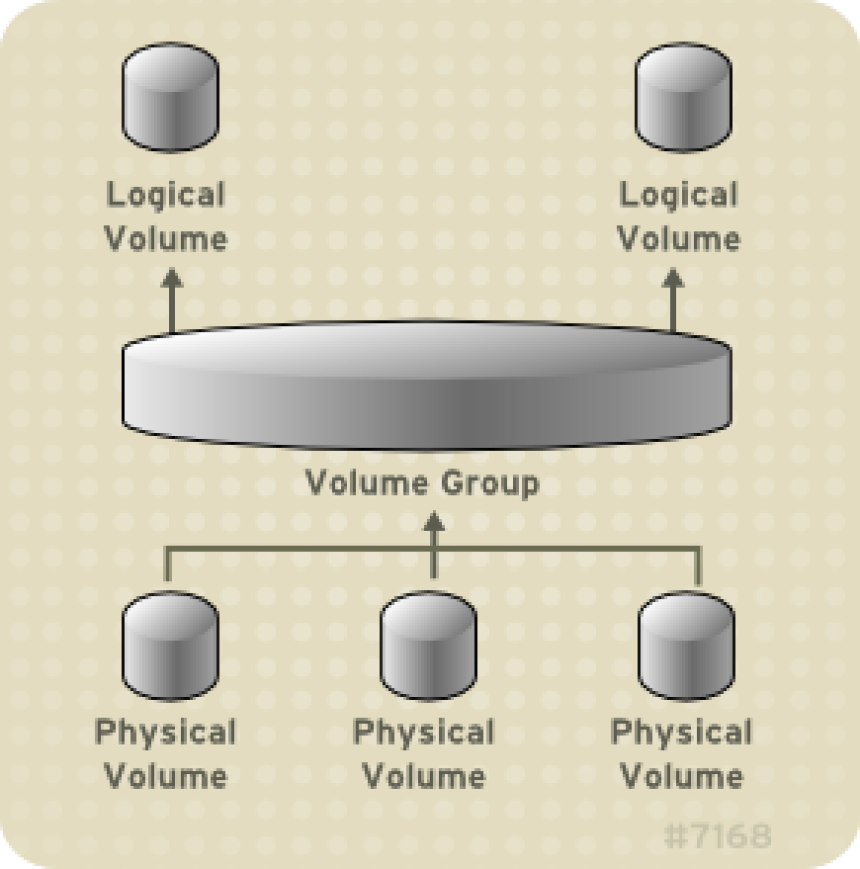
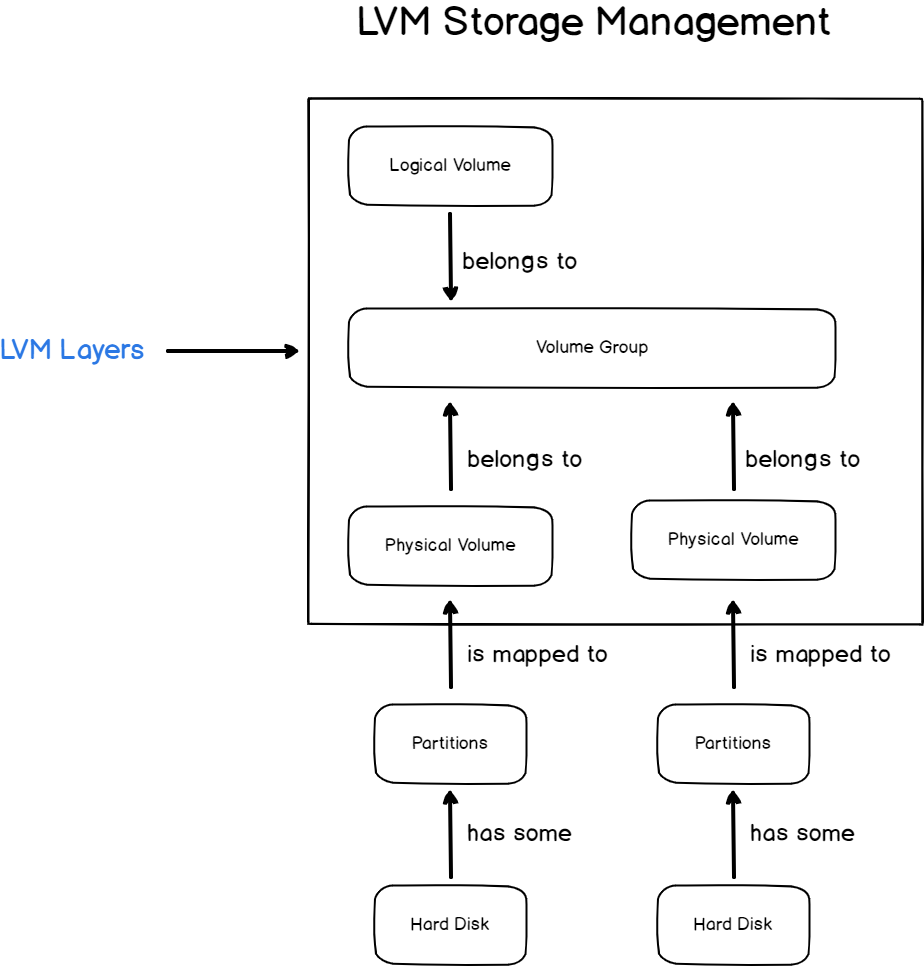
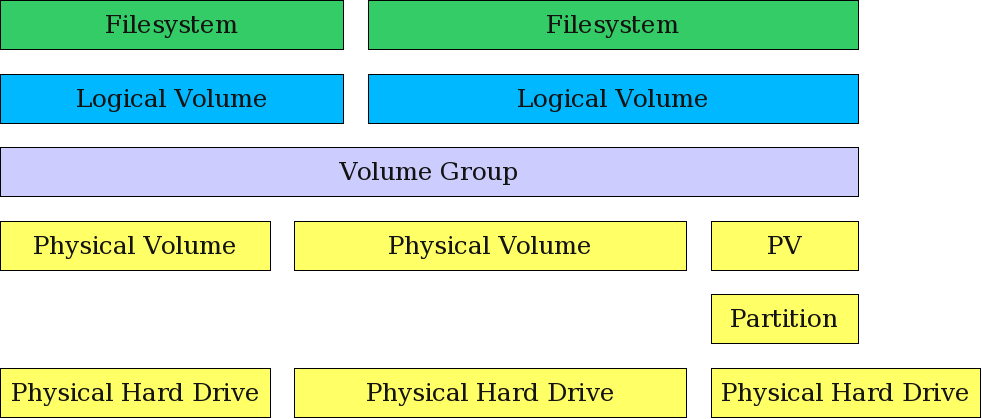
The Logical Volume Manager (LVM) provides tools to create virtual block devices from physical devices. LVM is a collection of one or more physical devices called Volume Group (VG), each physical device on the VG called a Physical Volume (PV). A Logical Volume (LV) is a virtual block device that can be used by the system or applications. Each block of data in an LV is stored on one or more PV in the VG, according to algorithms implemented by Device Mapper (DM) in the kernel.
LVM helps us to create flexible disk space management includes allocating disks, striping, mirroring, and resizing logical volumes. We are going to learn these in this tutorial.
For more information about LVM, please refer: Beginners guide to how LVM works in Linux
Вступление
Logical Вolume Manager или LVM, уже был рассмотрен на HTG, а также почему вы должны его использовать. Поскольку LVM становится все более популярным, где некоторые из основных игроков, таких как CentOS и Ubuntu, с их последней версией 12.10, теперь устанавливая на LVM по умолчанию, вы можете столкнуться с ней раньше, чем вы могли бы подумать. В приведенном выше примере, вероятно, будет недолго до того времени, когда вы захотите управлять LVM, чтобы увеличить пространство, доступное на томе, например … с этим было сказано, что может быть приятнее, чем приятный графический интерфейс для сделать работу? Ничего, поэтому установите его.
LVM Structure
The structure of a Logical Volume Manager disk environment is illustrated by Figure 1, below. Logical Volume Management enables the combining of multiple individual hard drives and/or disk partitions into a single volume group (VG). That volume group can then be subdivided into logical volumes (LV) or used as a single large volume. Regular file systems, such as EXT3 or EXT4, can then be created on a logical volume.
In Figure 1, two complete physical hard drives and one partition from a third hard drive have been combined into a single volume group. Two logical volumes have been created from the space in the volume group, and a filesystem, such as an EXT3 or EXT4 filesystem has been created on each of the two logical volumes.

Figure 1: LVM allows combining partitions and entire hard drives into Volume Groups.
Adding disk space to a host is fairly straightforward but, in my experience, is done relatively infrequently. The basic steps needed are listed below. You can either create an entirely new volume group or you can add the new space to an existing volume group and either expand an existing logical volume or create a new one.
Заключение
Напоминаю, что данная статья является частью единого цикла статьей про сервер Debian.
Онлайн курcы по Mikrotik
Если у вас есть желание научиться работать с роутерами микротик и стать специалистом в этой области, рекомендую пройти курcы по программе, основанной на информации из официального курcа MikroTik Certified Network Associate. Помимо официальной программы, в курcах будут лабораторные работы, в которых вы на практике сможете проверить и закрепить полученные знания. Все подробности на сайте Курcы по ИТ.
Стоимость обучения весьма демократична, хорошая возможность получить новые знания в актуальной на сегодняшний день предметной области. Особенности курcов:
- Знания, ориентированные на практику;
- Реальные ситуации и задачи;
- Лучшее из международных программ.
Заключение
Чтобы управлять данными в системе, нам нужно хранить их организованным образом. Некоторые файлы необходимо хранить в одной файловой системе, а некоторые — в другой, в зависимости от требований. В этом сценарии мы должны управлять файловыми системами на наших блочных устройствах на машине. В этом руководстве мы узнали, как создавать логические тома и различные файловые системы на блочных устройствах. Мы обсудили, как инициализировать блочные устройства как физические тома и как группы томов, логические тома и файловые системы могут быть созданы с помощью интерфейса командной строки и инструмента графического пользовательского интерфейса.