
Solution 1. Free up Enough Scratch Disk Space
Usually, the C drive will be automatically set as the scratch disk if you don’t set it yourself. To free up enough disk space, you can follow the detailed steps below. Let’s start with Windows. (Here we take Photoshop CS6 on Windows 10 for example)
Step 1. Open your Adobe Photoshop to get its main interface. Then navigate to Edit (Win) > Preferences and double-click Performance…
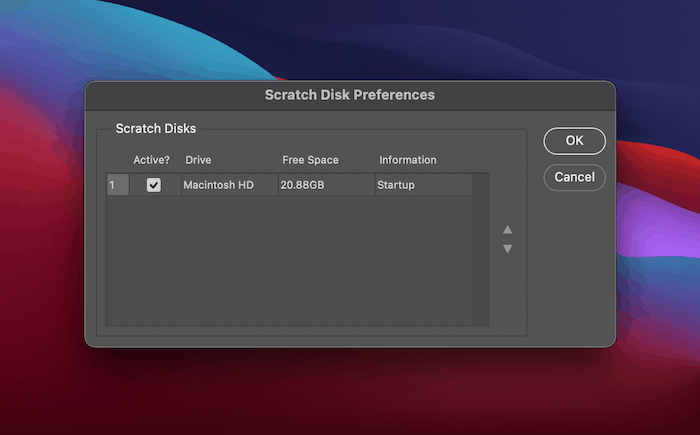
Step 2. In the pop-up window, you will see which partition is your scratch disk and make sure there is at least 40GB free space. If it does not, you can remove some parts of undesired files to another drive like a USB drive to free up enough space.
After that, you can restart your Photoshop to check if the “could not initialize Photoshop because the scratch disks are full” issue is resolved.
If your Photoshop fails to open, you can follow these steps instead. Press Ctrl + Alt keys to call out the Preference window. Then you can find which hard drive is your scratch disk and decide to free up enough space.
If you run this program on Mac, just press Command and Options keys instead to call out the Scratch Disks Preferences window and free up enough space.
Clearing Scratch Disk in Premiere Pro
If you’re using Premiere Pro to process videos, you might be wondering how to clear its scratch disk as well. Premiere Pro uses a cache system to store temporary files. To locate and remove them, follow these steps:
- Open the Edit tab.
- Open Preferences at the bottom of the dropdown menu.
- Select the Media Cache… from the Preferences menu.
- In there, you’ll find the local path for the cache. You can select a new path, even on a different drive, if you want to change it.
- If you want to delete the contents of the cache, press Delete.
- You can also set up Premiere Pro to delete cache files automatically. There are two options for that.
- If you want to remove old files, select the option Automatically delete cache files older than and then input the number of days. Your system will remove any files that are older than that number of days.
- If you want to keep your cache below a certain amount of memory usage, select the option Automatically delete oldest cache files when cache exceeds, then input the maximum GB amount you want to assign to your cache. If your cache ever exceeds that, it will remove the oldest files until it goes below the limit.
Premiere Pro can use multiple scratch disks for any of its project components. To access them, follow these steps:
- Open the Edit tab.
- Then, select Preferences > Scratch Disks.
Premiere Pro will list all scratch disks depending on the part of the current project. You can change where these scratch disks are by selecting which drives to use in the appropriate menu. By default, the scratch disk is the same as the project storage, but you can also use the My Documents folder or a custom path of your choice.
Solution 6. Clear the Photoshop Caches
The issue “could not initialize Photoshop because the scratch disks are full” still persist? You may check if there is too much Photoshop cache on your scratch disk, which will also lead to the problem. You can follow the steps to clear the caches.
Step 1. Select Edit (Win) or Photoshop (Mac) and go to Purge.
Step 2. Click on All from the 4 different options. If the item is greyed out, that means the caches have been deleted.
Step 3. Then you will receive a warning message saying “This cannot be undone. Continue?” If you don’t need a previous version of these documents, click OK.
In fact, this process won’t remove the Photoshop caches completely in system folders. To prevent Photoshop caches from piling up, you may try to run a regular disk cleanup.
In a word, the Photoshop scratch disks full issue happens because there is not enough free space on your RAM memory and hard disk. We explored the above 6 solutions from the perspective of lacking RAM space and Photoshop itself.
So, the following 3 methods take the hard disk space into consideration. If Photoshop plays an important role in your daily work, the better choice is to consider buying a larger SSD or extend the partition so that you can run Photoshop faster and save more files.
In the following 3 solutions, the operating steps are performed on Windows.
What is a scratch disk?
First things first, you may be curious about what the scratch disk is. Here’s a simple introduction to help you gain a general sense of scratch disk:
Photoshop requires a working space called virtual memory or cache memory when you’re working in it. When there’s not enough RAM on your computer, Photoshop would use your hard drives as temporary space, and these hard drives are called “scratch disk”. If there is only one hard drive on your computer, the scratch disk is the system drive. If you’re working with large images or layers on Photoshop, Photoshop would then create a mountain of temp files. As a result, when both your RAM and scratch disk become full of temp files, you get the error: scratch disk are full.
Scratch Disks Are Full FAQ
How to Fix Scratch Disks Are Full in Photoshop?
To fix the scratch disks are full issue, you can try the several methods below.
- Free up your scratch disk space.
- Delete some temporary files.
- Allow Photoshop more RAM usage.
- Change the scratch disk location.
- Disable the Auto-Recovery Saving feature.
- Delete the Photoshop caches.
- Extend the scratch disk space or upgrade your hard drive.
- Defragment your hard drive.
How to change the scratch disk?
- Open your Photoshop and go to the Performance tab and select Scratch Disk.
- Tick the checkbox to select a drive as the scratch disk or remove a drive.
- Click on OK to save the change and restart Photoshop.
How much free space of my scratch disk?
- Open your Photoshop and check which hard drive is selected as the scratch disk.
- Navigate to Preferences > Performance in order.
- Then you can check which drive is using and how much free space it has under the Scratch Disks section.
How to delete the temporary files?
- Press the Win + R keys to open the Run dialog box, and then type %temp% in it and hit Enter.
- Press Ctrl + A keys to select all temp files or you can select some certain.
- Press delete key and click on Yes to confirm this operation.
Frequently Asked Questions:
How do I empty the scratch disk in Photoshop?
If you wish to completely clear a scratch drive of past data, you’ll have to manually locateand remove the files. Once there, look for the file Photoshop Temp, followed by aseries of numbers. This is the file that includes all of Photoshop’s temporary data whenit starts up. To clear this file, delete it.
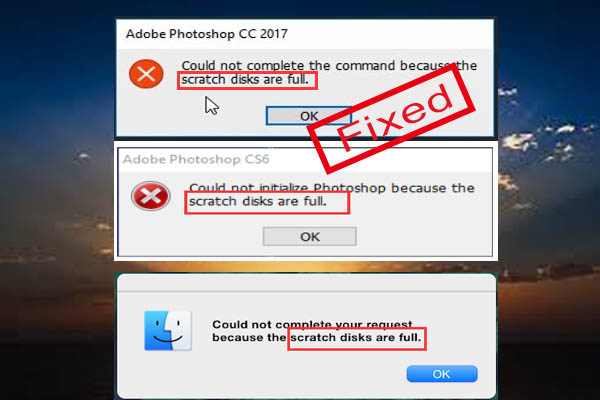
Why is my scratch disk full Photoshop?
Photoshop sets the primary scratch disc to the hard drive where the operating system is installed by default. When you get a ‘Scratch disc full’ error, it usually implies that the hard drive (or drives) you’re using as a scratch disc is (are) running out of storage capacity.
3 fixes for scratch disks are full:
Note: You may probably fix your problem through the first fix . But in the long term, we recommend you perform all the fixes as you can work in Photoshop properly.
Fix 1: Delete your temp files of Photoshop
The scratch disks are full error probably happens when your scratch disk become full of the temp files. Once the error pops up, simply delete your temp files of Photoshop to make room for new job. And don’t worry to delete these temp files, it’s safe.
Here’s how:
1) On your keyboard, hold down the Windows logo key and press the R key to bring up the Run box.
2) Type appdata and press Enter.
3) On the open window, go to Local > Temp.
4) Find and highlight all the files start with ~PST or Photoshop temp.
5) On your keyboard, hold down the Shift key, then press the Del key to delete all the Photoshop temp files.
6) On your Photoshop interface, click OK on the “scratch disks are full” error message window and restart Photoshop and edit your picture to see if it works fine.
Fix 2: Clean up your scratch disks
Sometimes you might get the same scratch disks are full error not too long after you deleting the temp files. In case of that, you can go on to clean up your scratch disk.
First things first, you need to find out which drive is the scratch disk for the Photoshop on your computer. It’s easy to figure out:
If you can access the Photoshop interface properly, click Edit (for Mac users, click Photoshop) > Preferences > Scratch Disks. Then you’ll see which is your Photoshop scratch disk.
If you can’t open Photoshop on your computer, follow these steps instead:
Run Photoshop, as soon as Photoshop starts, on your keyboard, press the Ctrl and Alt keys at the same time to bring up the Scratch Disk Preference window.
Note: If you use Mac, press the Command and Option keys instead.
Make sure your scratch disk have at least 40 GB free space. If it doesn’t, move to your scratch disk and remove your unwanted files.
Fix 3: Change your scratch disk allocation
If you want to keep Photoshop run fast on your computer, you can change its scratch disk allocation. Make sure do not select your system drive, a network or removable drive as the scratch disk.
Follow to open the Scratch Disk Preference window: Run Photoshop, as soon as Photoshop starts, on your keyboard, press the Ctrl and Alt keys at the same time. If you use Mac, press the Command and Option keys instead.
Then you can set a drive with much more free space as the scratch disk, and also, you can set a second, third or fourth scratch disk more.
By April Cai
April, a Microsoft Certified Professional(MCP), aims to make readers’ tech life easy and enjoyable. She’s passionate about helping people solve their computer, phone & app woes. That’s not giving you a lot of detail, is it? So read more from the following articles.
Contributor(s):
View all of April Cai’s posts.
Solution 2. Delete Your Temp Files
A large chunk of temp files is also responsible for Photoshop scratch disks full error. Here you can follow the steps to delete Photoshop temp files on Windows.
Step 1. Press Win + R keys to open the Run dialog box. Type appdata and hit Enter.
Step 2. Navigate to Local > Temp. Then you can find the files with ~PST or Photoshop Temp.
Step 3. Then select all the temp files by holding Ctrl key and press Del key to delete all.
Step 4. Restart your Photoshop to see if the Photoshop scratch disks are full error still persists.
If you are run Photoshop on Mac, you can type the file extension that begins with “pst” or “Photoshop Temp” in the search box and delete these files when all the files appear. This process will take some time.
If the method fails to fix the problem “could not initialize Photoshop because the scratch disks are full”, just move on to the following methods.
Reasons Behind the Full Scratch Disk Error in Photoshop
Temporary files are the main reason why Photoshop’s scratch disk is full. As you know, Photoshop is a large design program. When you use it to create and edit images, it generates a large number of temporary files that can make Photoshop run faster. But over time, these files pile up and take up a lot of the space of the scratch disk.
In addition, when the hard drive used as the scratch disk runs out of storage space, you may also get the prompt window that says the scratch disk is full. To find out if you have any available storage space, click the Apple Menu > System Settings > General > Storage.
Another reason behind the scratch disk full error is limited RAM for Photoshop. In this case, you may need to add more memory.
Scratch Disk: What Causes The Error To Come Up!
Before you start to resolve the issue of photoshop scratch disk full mac, it is crucially important to get a brief idea of what the error scratch disks are full photoshop signifies. Heres’ what photoshop scratch disk full windows mean and how can’t open photoshop scratch disk full mac triggers:
Adobe software programs are heavy. That means the software size is much bigger than any other common application. In order for it to run properly, sufficient space is needed in RAM. So, to store temporary data, Photoshop uses the hard drive as virtual memory.
This hard drive is also known as the scratch disk. This disk is used to store many uncountable temp files. So, over the course of time, it gets accumulated. As a result, space decreases. So, if there is no space in RAM and the hard disk then it will prevent new files from being created.
Now that you have an idea of what is happening, go through the fixes below!
Solution 3. Change Your Scratch Disk Location
Changing your scratch disk location is another effective way to fix the issue “Photoshop scratch disks are full”. Here is how to that:
Step 1. Open your Photoshop. Then navigate to Edit > Preferences and click on Performance.
Step 2. Select another hard drive near the First option and click OK. Then Photoshop will set the new hard drive as the scratch disk after you restart your Photoshop.
Note: It is recommended that you choose the fastest drive with most free space as your scratch disk.
If you are on Mac, you can follow these steps.
Step 1. Open Photoshop. Then go to Photoshop, Preferences and select Scratch Disks from the left pane.
Step 2. In the new window, uncheck a hard drive that you don’t want to set it as a scratch disk and click OK. Then restart your Photoshop.
Now, check if the issue “Could not complete your request because the scratch disks are full” is gone away.
How To Fix Scratch Disks Are Full Error
However, there are several methods to resolve the “scratch disks are full” errors. Below are the top 7 methods to fix the errors related to scratch disks in Photoshop.
1. Clean your scratch disks and temp files using CleanMyMac
If you are facing a “scratch disks are full” error, then you can use CleanMyMac to remove the scratch disk in Photoshop. It has great features to remove all the clutter in your Mac. One of the features is Space Lens which quickly scans all the folders and detects which folder is consuming space with the clutter.
It can examine the complete system and delete the files and folders you don’t want in your Mac to free up space. It also has the feature of Large and old files which examines each file according to its size.
Below are the steps you need to follow to use CleanMyMac to get rid of the “scratch disks are full” error:
Firstly, launch CleanMyMac on your Mac
image source: macpaw.com
- Go to the left side of the page and choose the space lens feature
- Now, click on the scan option which is mention at the bottom of the page
- It will analyze your system and now, you can choose the folder you want to delete
- At last, click the Remove option mentioned at the bottom of the page
2. Clear the cache in Photoshop
If the scratch disks are full in your system then you can use this effective solution to clean up space. You can clear the cache in Photoshop to get rid of the “scratch disks are full” error. Photoshop has the in-built tool to remove Photoshop caches. Following are the steps you need to perform to clear the cache:
- Firstly, open Photoshop in your Mac and click on the edit option
- Go to the purge option to expand other options, either click all to delete all the cachesor select the option you want to delete
A pop-up message will occur warning you that the removal cannot be undone and click on the OK button
3. Remove the temp files
Temp files are the main cause of scratch disks are a full issue so to get rid of the error first you need to remove the temp files. It is the best way to clear the disk space and provide smooth running.
To search the temp files locate those files starts with “pst” or Photoshop Temp and has “.tmp.” file extensions. It will bring a list in front of you then choose the files you want to delete. It is the easiest and quickest way to remove temp files.
4. Making partition for Scratch Disks
If you are receiving an error message while opening or working on Photoshop related to scratch disk then making a partition can help you in fixing the issue. But follow the method if you already know about disk management as wrong applications can create more harm to your Mac or you may lose your data.
- Press Windows + R keys together to open the Run bar
- Type “diskmgmt.msc” and hit the enter key
- Now, choose the disk that you are using as a scratch disk and right-click on it and select the shrink volume option
- And choose the size you want for your scratch disk
- When you are done, launch Photoshop and hold the ctrl + Alt keys together and choose the new partition which you have created.
5. Locate the hidden files in your Photoshop
There are many files and folders which you have placed previously and are not required in the present time and consuming lot of space of your Mac and causing “scratch disks are full” error. Firstly open the Photoshop folder and can simply hold Command + Shift + Period to get the hidden files.
1. Change the location of your scratch disk
When the scratch disks are full you can clear them by changing the location of your scratch disk in Photoshop. Below are the steps you need to follow to execute the method:
- Firstly, launch Photoshop on your Mac and go to the menu bar and choose Photoshop
- Now, press Ctrl + Alt keys or you can also press Cmd + OPT
- It will open a scratch disk preferences window
- Choose the desired drive and click on the OK option
- At last force-close Photoshop and then open the Photoshop again to apply the changes
2. Boost the RAM space
If you increase the RAM space then it might help you in fixing scratch disks that are full issues. You can use 60% of the total RAM set by default. You can enhance it by following the steps:
- Firstly, launch Photoshop and move to Edit
- Now, select preferences among the options and then select performance in the given options.
- When the performance window appears, increase the RAM usage by moving the slider under the Memory usage.
Conclusion
In the above article, we have discussed what is a scratch disk and problems related to the scratch disk. Also, we have listed the 7 methods to fix the error and free up the disk space to work properly. You can choose any of the methods as per your preference. I hope the article would help you in fixing your issue with these effective methods.
Also Read
Solution 5. Disable Auto-Recovery Saving
To avoid an unexpected Photoshop exit such as a crash or computer reboot, this program will try to auto-recover your document. But this process also takes up some parts of your hard drive space.
So, disabling the auto-recovery saving may solve the scratch disks are full Photoshop issue. Here are the detailed steps:
Step 1. Open your Photoshop. Then navigate to the Edit (Win) or Photoshop (Mac) > Preferences and click on File Handling.
Step 2. In the pop-up window, uncheck Automatically Save Recovery Information Every . Then click OK to apply this change. After that, the size of your Photoshop temp files will be reduced. This might resolve the “Could not complete your request because the scratch disks are full” issue.
Note: This change may cost you at the risk of having no auto-recovery. So, please save your document timely in case of any data loss.
Possible Causes for Photoshop Scratch Disks Full Error
Scratch disk can be used to store certain program files like Adobe Photoshop. What causes the scratch disks are full error are? According to the reports we gathered and investigated, there are several possible causes that are responsible for Photoshop scratch disks full issue.
- Lack of enough space: If there is not enough space on RAM memory, Photoshop will use hard drive space (usually C drive) as a temporary virtual storage holder, which may cause “scratch disks are full” problem.
- Too many temporary files: Some users close their Photoshop without giving it enough time to properly close down. This behavior will bring a large chunk of temporary files occupying too much scratch space.
- Too much Photoshop cache: If your program cannot delete the caches automatically, the cache will grow and take up lots of scratch space, which may lead to the error “Could not complete the command because the scratch disks are full”.
So how to fix scratch disks are full Photoshop? Let’s begin!
Исправить рабочие диски Photoshop заполнены
Если вы видите Не удалось выполнить команду, потому что рабочие диски Чтобы устранить проблему, выполните следующие действия:
Удалите временные файлы Photoshop Увеличьте пространство на рабочем диске Изменить местоположение рабочего диска Отключите восстановление Photoshop Разрешите Photoshop использовать больше ОЗУ
Убедитесь, что вы четко понимаете, как изменения повлияют на работу.
1] Удалить временные файлы Photoshop
Открыть запрос «Выполнить» (Win + R). Введите% temp% и нажмите клавишу Enter. В папке выберите все файлы с именами Photoshop или PST. Для удаления используйте Shift + Delete. файлы навсегда
2] Увеличить пространство рабочего диска
Photoshop рекомендует использовать как рабочий диск не менее 6 ГБ дискового пространства. Если у вас недостаточно свободного места на диске, используемом в качестве рабочего диска, вам необходимо увеличить его. Мы все, что минимальное местоположение по умолчанию не работает большую часть времени.
Чтобы вычислить, если свободное пространство на вашем рабочем диске составляет 10 ГБ, доступное дисковое пространство, которое будет учтено Photoshop, равно 10-6.=4 ГБ, и этого может быть недостаточно.
Вы можете изменить расположение или удалить ненужные элементы, чтобы освободить место.
3] Изменить расположение рабочего диска
Если у вас есть запасной жесткий диск или другой раздел на вашем компьютере, вы можете заменить его на него, хотя мы по-прежнему рекомендуем использовать SSD через жесткий диск и внешнее расположение.

Откройте Photoshop и перейдите в Настройки. Выберите Правка> Настройки> Рабочие диски (Win) или Photoshop> Настройки> Рабочие диски (Mac). Чтобы изменить порядок рабочих дисков, нажмите кнопки со стрелками и затем выберите новый местоположение.Нажмите ОК. Чтобы применить изменения, перезапустите Photoshop.
4] Отключить Photoshop Recovery
Adobe Photoshop автоматически сохраняет файлы по мере того, как вы работаете с ними, но это увеличивает объем оперативной памяти, которую использует приложение. Вы можете отключить сохранение с автоматическим восстановлением, если вам бесполезно освобождать место на рабочем диске.
Запустите Photoshop на своем ПК, нажмите «Файл»> «Настройки», а затем выберите «Обработка файлов». Снимите флажок с надписи Автоматически сохранять информацию для восстановления.
5] Разрешить Photoshop использовать больше ОЗУ
Рабочие диски используются, когда объем ОЗУ недостаточен для хранения всего. Если на вашем компьютере имеется избыточная оперативная память, вы можете выделить Photoshop для ее использования.
Откройте Photoshop и перейдите в”Настройки”. > Производительность На боковой панели установите флажок- Разрешить использование Photoshop. Введите объем оперативной памяти, который вы хотите использовать в Photoshop. Затем нажмите OK, чтобы применить изменения.
Почему Photoshop говорите, что мои рабочие диски заполнены?
Photoshop использует рабочие диски для сохранения истории файлов и других временных файлов. Поскольку он работает на выделенном дисковом пространстве, он продолжает заполняться всем, над чем вы работаете. Когда он заполнится, вы получите сообщение об ошибке.
Как очистить рабочий диск, не открывая Photoshop?
Откройте Photoshop и затем нажмите «Правка» в строке меню. Выберите «Очистить», а затем-«Все» . Он очистит место, занимаемое на рабочем диске. Если вы не можете открыть Photoshop из-за этой проблемы, вы можете удерживать клавиши Ctrl + Alt в Windows Cmd + Option в macOS, чтобы установить новый рабочий диск.
Не удалось инициализировать рабочие диски Photoshop, заполнены?
Рабочие диски используются Photoshop почти для всего, включая инициализацию. Когда он заполнен, Photoshop тоже не запустится.
Как сбросить Photoshop?
Используйте CTRL + ALT + SHIFT в Windows, чтобы запустить Photoshop, и когда спросите- Удалите файл настроек Adobe Photoshop -выберите”Да”. Вы также можете выбрать «Настройки»> «Общие» и нажать кнопку Сбросить настройки при выходе . Закройте Photoshop и перезапустите его.
Другой способ удалить файл настроек-перейти в Users//AppData/Roaming/Adobe/Adobe Photoshop /Настройки Adobe Photoshop и удалите все внутри него.
В macOS расположение установлено в Пользователи//Библиотека/Настройки/Настройки Adobe Photoshop .
В целом ошибку можно легко устранить, очистив пространство или добавив дополнительное пространство или ОЗУ для Photoshop. Как только пространство станет доступным, ошибка должна исчезнуть
Однако важно выделить достаточно места для хранения, если вы много редактируете. Я надеюсь, что за этим постом было легко следить, и вы смогли исправить Photoshop Scratch Disks-это полная проблема
How to Clear a Scratch Disk in Photoshop
To locate where the scratch disk is, you can follow these steps:
- In Photoshop, open the Edit tab.
- Select the Preferences option at the bottom of the dropdown.
- Now, select the option Scratch Disks… from the side menu.
- Here, you’ll see a list of drives and checkmarks next to them. Each checkmark means that Photoshop is using that drive as a scratch disk.
- If you want to create a new scratch disk, check the box next to the drive you want to use.
- Photoshop will then allocate data to more locations, lowering the load on the boot drive.
If you want to clear a scratch disk from previous data altogether, you’ll need to find the files to remove manually.
If Photoshop is using your boot drive, then the following folder is where you’ll find its temporary files: C:\Users\\AppData\Local\Temp
Once there, find the file named Photoshop Temp followed by a string of numbers. This is the file that contains all the temporary data Photoshop uses when it boots up. Delete this file to clear it.
Do note that clearing the temporary files will also remove any progress on projects you haven’t saved, so make sure you have backed everything up beforehand.
If you’re not able to delete the file, then Adobe might be currently using them. Make sure that Photoshop and any other Adobe programs are correctly closed.
Alternatively, you clean Photoshop’s current cache for the project:
- Again, open the Edit tab.
- Next, select Purge > All.
Clearing the entire Photoshop cache will remove any past versions of the current project, leaving only the current version in its memory. If you’ve been making many sweeping changes, this can save a lot of memory, but you can’t go back to any previous versions.
How to Clear Scratch Disk in Photoshop on Mac
After understanding what a scratch disk is and why the scratch disk full error occurs in Photoshop, we come to the most important part of how to clear scatch disk in Photoshop.
1. Clear Photoshop Cache
Photoshop has a built-in cleaning function that allows you to clean up the history and caches in Photoshop. But please note that this cleanup is irreversible, and all deleted history and caches cannot be restored.
Here’s how to clear the caches in Photoshop:
-
Open Photoshop on your Mac.
-
Click the Edit button in the menu bar, hover your mouse over Purge, and select the item you want to clear or select All to remove all your caches in Photoshop.
-
You will be prompted to a new window that warns your deletion cannot be restored. Click the OK button if you are sure to go.
2. Free up Disk Space
Adobe says that you should reserve at least 20GB of free space on your macOS hard drive while working with Photoshop. Depending on the type of file you are working on, you may also need to set aside additional storage space to ensure that Photoshop runs properly.
There are various ways to free up your Mac disk space, such as deleting useless files, removing duplicate files, uninstalling unwanted apps, moving files you don’t use currently to another disk, etc.
Here we would like to introduce you a handy tool — BuhoCleaner, one of the best cleaners for Mac. Not only can it help you clear junk files from the system, users, and applications, but it can also speed up your process of finding and deleting large files and duplicate files. Click the button below to have a try now.
![Scratch disks are full? – here are solutions to fix it [clone disk]](https://tehnik-shop.ru/wp-content/uploads/f/8/e/f8e9d76e9c26ad61579afe3781e45799.png)
3. Delete Photoshop Temporary Files
Photoshop creates a lot of temporary files as you use it. You can go to Finder to find and delete these temporary files manually. Most of the time, the temporary files start with pst, followed by numbers, and end with a .tmp extension.
Here are the how-to steps:
- Click the Finder icon on the Dock.
- Type Photoshop Temp in the search box in the upper right corner of the Finder window.
- In the appeared list, find the temporary files you want to remove and drag them to the Trash.
Note
This process may take you some time. You’d better make sure the files you want to get rid of are no longer useful to you before deleting them.
4. Change Photoshop Scratch Disk
Still haven’t freed up enough disk space for Photoshop? Choose another disk as a scratch disk. If you don’t have another disk to choose from, you’ll need to add a new disk on your Mac first. SSD is your best bet.
Here’s How to Change Scratch Disk in Photoshop:
- Click the Photoshop Menu > Preferences > Scratch Disks.
- Check the box to select or delete the disk as the scratch disk, and then click the OK button.
- Relaunch your Photoshop.
Note
You can also press and hold the Command + Option keys while launching Photoshop to quickly change your scratch disk.
5. Change RAM for Photoshop
By default, Photoshop uses 70% of the memory space. You can adjust this value as needed. However, we strongly recommend that you do not exceed 85% at most. Otherwise, it may cause poor performance of other applications due to insufficient memory.
- Click the Photoshop Menu, and then select Preferences > Performance.
- Drag the memory usage slider to quickly adjust the amount of memory allotted to Photoshop.
- Click the OK button, and then restart Photoshop.
6. Optimize Photoshop Space
You can also optimize the space Photoshop uses by disabling the auto-recovery saving and limiting the history states.
To stop the auto-recovery saving, click the Photoshop Menu > Preferences > File Handling and untick the box next to Automatically Save Recovery Information Every.
Photoshop can save up to 1000 history states, and it presets the number to 50. To reduce the number, click the Photoshop Menu > Preferences > Performance and change the number to any number you like.
Conclusion
By the way, BuhoCleaner is a worthwhile cleaner that can be your perfect tool for cleaning and optimizing your Mac. Go ahead and try it yourself.
Additional FAQ
Can I Add More Space to My Scratch Disk in Photoshop?
The easiest way to add more space to scratch disks is to distribute them across multiple drives. You can select any number of disk drives your device has for the scratch disks.
1. To create a new scratch disk, access the Scratch Disk menu and check the drive you intend to use. Photoshop can use four disk drives as scratch disks and 64 billion GB of storage to do so, but it is unlikely you’ll ever use or need that much.
2. Alternatively, you can add a new disk drive to your device and dedicate it as a primary scratch disk for Photoshop. We recommend using an SSD, as they read and write data faster. Scratch disks won’t easily reach terabytes of data usage, so you will be safe using a regular SSD. RAID disks, or disk arrays, are a great option to use for a scratch disk, but this will require a bit of Googling and tinkering on your part.
Additionally, you want to consistently clean other temporary files on your device to prevent your scratch disk from filling up.
What Should You Do When Your Scratch Disk Is Full?
If your drives are full, you have a few options.
1. To start, you can remove anything you’re not using. You can store past projects and data on an external drive, for example, to not take up active space. Make sure you defragment the drive after freeing up space to allow Photoshop to access the entirety of it.
2. Next, you can delete Photoshop’s temporary files. This will remove any remnants of past projects that you don’t want to keep and allow you to start fresh. Alternatively, clean Photoshop’s cache for current projects.
3. As a final option, you can install additional disk drives, then put the scratch disk there.
Optimizing Disk Space for Photoshop
If Photoshop is not using a lot of memory on its own, or you’ve already cleared your scratch disk, and you keep receiving an error that the disk is full, you’ll need to delete additional files on the drive.
Your first option for clearing some space is using the built-in Disk Defragmenter. To do so, follow these steps:
- Open the Start Menu.
- Type in Defrag.
- Disk Defragmenter should pop up as a result. Click on it to open.
- In the menu, select the drive you want to clear.
- Then, press Analyze.
Disk Defragmenter doesn’t delete files, it only reallocates them, so you have more free space available. Having more linked free memory is essential for larger files. For example, Photoshop can have huge files for its cache, which won’t fit in a drive if the open space is segmented.
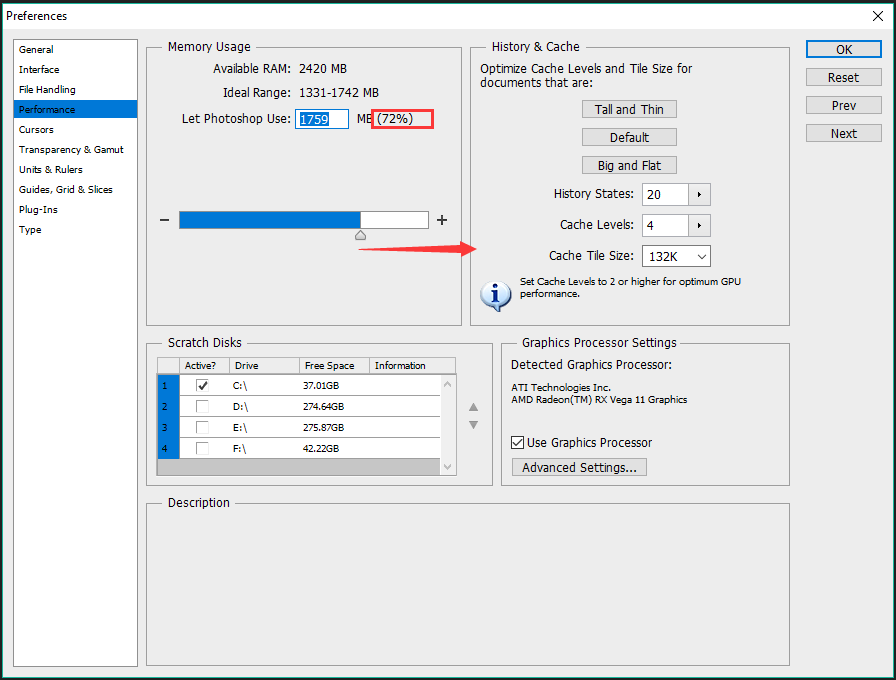
Solution 4. Allow Photoshop More RAM Memory Usage
As mentioned above, RAM memory is important to store Photoshop files. Usually, Photoshop is set to take up 60% of your total RAM by default. In fact, In fact, you can fix the problem “could not complete the command because the scratch disks are full” by allowing it more RAM memory. Here is how:
Step 1. Launch this program, then go to Edit > Preferences and click on Performance.
Step 2. Inside the Preference window, you can adjust the Memory Usage to increase the RAM memory by pulling the triangle handle right towards.
Note: Do not set it more than the 80% threshold, since it will make your PC run slower.
After allowing more RAM usage, you can restart your Photoshop to see if the error “scratch disks are full” is fixed.
If you are a Mac user, you need to choose Photoshop > Preferences> Scratch Disk, and then adjust the RAM memory space by the prompts.